Configure LIVE EDA

To successfully create and work in a LIVE EDA case in OPEN DISCOVERY, you must configure LIVE EDA in both the LIVE EDA Admin UI and in the OPEN DISCOVERY LIVE EDA case.

Warning: In addition to completing the configuration processes explained in this topic, you must complete the required configuration tasks in the LIVE EDA Admin UI. For more information about how to complete these configuration tasks, start with Configure Locations. Then, to ensure all users are mapped, consult Configuring User Mapping. To make the live data available and searchable in the LIVE EDA case, set up and run the required indexing and archiving jobs in the LIVE EDA Admin UI. Consult Configuring Teams Indexing and Configuring Slack Indexing, followed by Configuring Teams Archiving and Configuring Slack Archiving.

This article outlines the tasks that must be completed to configure LIVE EDA Search within OPEN DISCOVERY, post-installation of LIVE EDA services. The applicable workflow is shown in the following diagram. This topic also includes links to user guides that further describe the action(s) or function(s) mentioned.

Closed
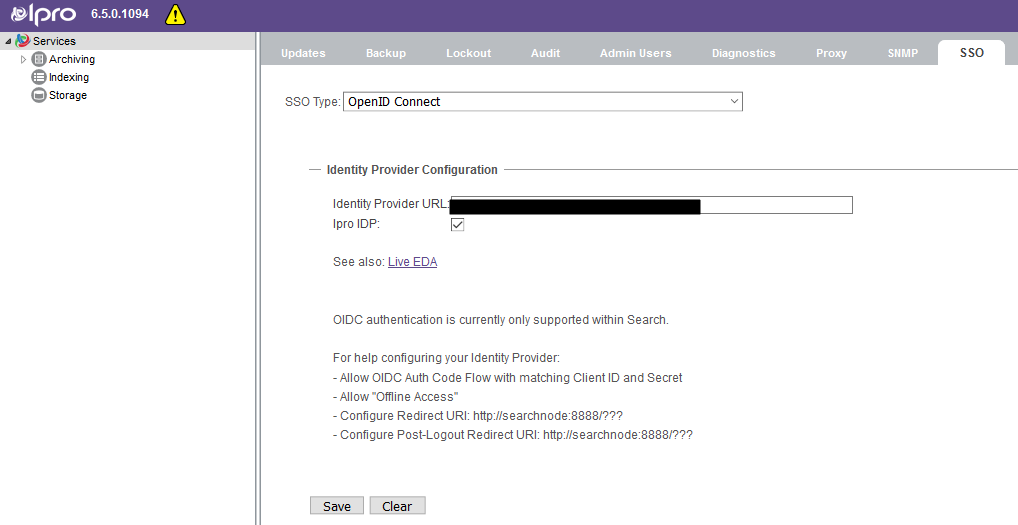
1. Enable SSO in the LIVE EDA Admin UI

First, implement SSO (Single Sign-On). You will be completing the tasks of an Administrator.

  1. Open the LIVE EDA Admin UI. Log in with your credentials.

  2. On the Services Home page, click the SSO tab.

  3. From the SSO Type dropdown menu, select OpenID Connect.

  4. In the Identity Provider URL field, enter the URL of the IPRO Identity Server.

  5. Enable IPRO IDP. Select the checkbox.

  6. Click Save.

Closed2. Enable SSO in OPEN DISCOVERY

Configure the SSO settings for OPEN DISCOVERY services.

  1. Set up a remote connection to the IPRO Identity Server machine.

  2. Go to the Identity Server installation folder.

  3. Open the appsettings.json file: C:\Program Files\IPRO Tech\Web\Components\Identity\appsettings.json. This contains the redirects for the Identity Server.

  4. Add a new client. Follow the example below. The SERVER_URL is the URL of the master archive node or client access node.

  5. Save. Changes take effect immediately.

Closed3. Configure LIVE EDA Endpoints

Configure the LIVE EDA endpoints in the LIVE EDA Admin UI.

  1. Return to the LIVE EDA Admin UI.

  2. Navigate to the left-hand panel. Expand the Agents dropdown. Select LIVE EDA.

  3. In the Configuration tab, complete the following steps:

    1. Check the box Enabled. This will enable the LIVE EDA mode.

    2. Enter the BaseUI. The BaseUI is the UI for IPRO Web.

    3. Enter the BaseAPI. The BaseAPI is the UI for IPRO Services.

      Note: Entering the BaseUI and BaseAPI will automatically populate URLs in the QueryProcessingCases, PromoteDocuments, CaseAccessValidation, and NavPermission fields.

  4. Click Save Changes.

Closed
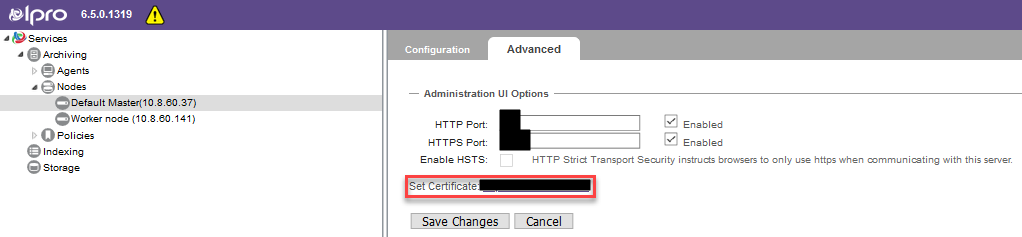
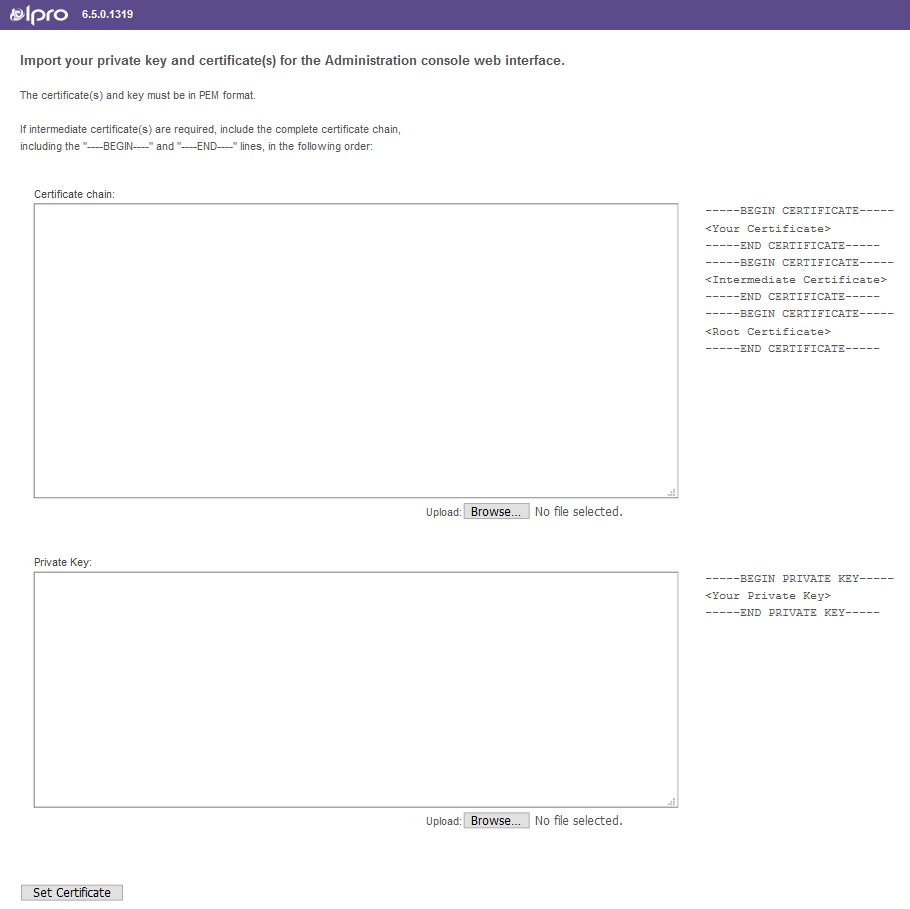
4. Set an SSL Certificate

To use LIVE EDA, you must set up the LIVE EDA Admin UI, LIVE EDA Search, and internal APID sites to use a trusted certificate. This requires configuration of the SSL certificate.

Note: An SSL certificate is required even if the environment is not exposing anything to the internet. In that case, however, it can be a self-signed certificate that is trusted by the IPRO IIS machine.

For information about how to generate a key and configure a certificate, see Installing an External Certificate for LIVE EDA.

  1. Navigate to the left-hand panel of the LIVE EDA Admin UI. Expand the Nodes drop-down menu. Select the Default Master node.

  2. Go to the Advanced tab and click Set Certificate.

  3. The URL of the LIVE EDA Admin UI for certifications will open. The private key and certificate are imported here.

  4. Use an SSL certificate in PEM format. Copy and paste it into the relevant directory, or click Browse to find the file.

    Note: If using the file browse method, you might be required to copy and paste the certificate chain and private key values in the correct directories, depending on the formatting of the certificate.

  5. Click Set Certificate to validate.

    Warning: LIVE EDA Services will restart during this process, and sites cannot be accessed until complete.

Closed5. Validate Services Run as Domain User
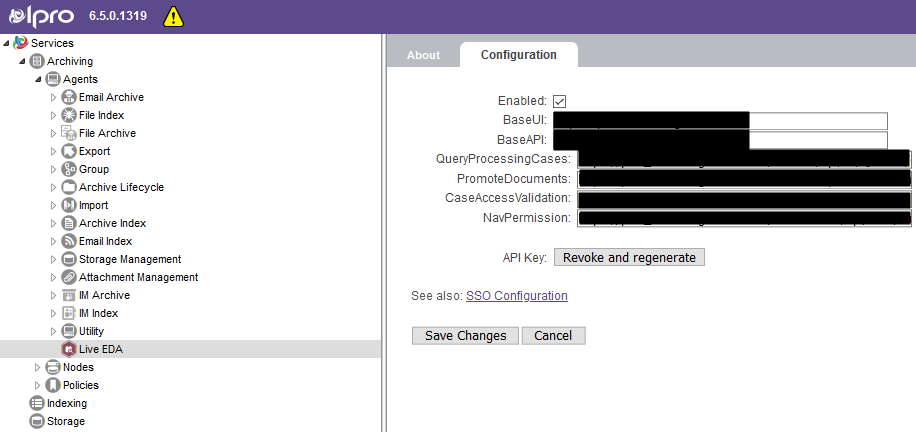
Once all services run on the same identity, you can start validation. When promoting a LIVE EDA case, the .zip archive file is copied to the eCapture or Processing case folder location. To do so, it needs access to that location, or location share. Ensure that the NetGovern services run as the specific domain user with access to that share.

During set up, you will need to provide NetGovern account credentials.

  1. Open the NetGovern node.

  2. Open Windows Services.

  3. Ensure that the Log On As account is set to the correct domain user for all following services. The selected user must be a local administrator.

    • NetGovern Platform Service

    • NetGovern Indexer

    • NetGovern Directory

    • NetGovern Client Access

    • NetGovern Archiving Service

    • NetGovern Archive

    • NetGovern Admin

  4. Update the accounts. Right-click the service, go to Properties, and select the Log On As tab. Test the account that is going to have access to both the NetGovern and OPEN DISCOVERY file shares.

  5. When you have updated an account, restart the service.

  6. Repeat the steps listed above for both the Default Master and the Worker nodes.

Closed6. Generate API Key

The LIVE EDA API Key allows the OPEN DISCOVERY LIVE EDA service to communicate to LIVE EDA.

Super Admin permissions are required to complete the following steps.

  1. Navigate to the left-hand panel of the LIVE EDA Admin UI. Expand the Agents dropdown. Select LIVE EDA.

  2. In the Configuration tab, click Generate to generate the API Key.

  3. Copy and paste the API Key value in a note created in Notepad. Save.

    Note: You can only generate the API Key once. It cannot be retrieved. If you lose it, you will need to return to this step, select Revoke and regenerate, and complete the steps in this section.

Closed7. Configure LIVE EDA Environment Settings in OPEN DISCOVERY

You can configure the LIVE EDA environment settings for OPEN DISCOVERY via the System Manager.

  1. Log in to OPEN DISCOVERY and navigate to the System Manager, accessed from the gear icon at the top-right corner of the screen.

  2. In the left-hand panel of the System Manager, select Environment Settings.

  3. Scroll down to EDA Settings.

  4. In Early Data Assessment Search Endpoint, enter the correct Search Endpoint. This is the URL the user navigates to in order to view the LIVE EDA case.

  5. In Early Data Assessment Environment Endpoint, enter the correct EDA API Endpoint. This is the URL of NetGovern's internal API.

  6. In Early Data Assessment API Key, paste the API Key.

  7. Click Save.

Note: You also have the option to configure environment settings during installation via the setup wizard. When prompted, enter the NetGovern Archive Web URL, NetGovern API URL and NetGovern API Key.

Manage Environment Settings at the Client Level

LIVE EDA will use the default environment unless otherwise specified. If your organization has multiple clients, you have the option to configure different environments for each client in the Case Management module:

  1. Click Case Management on the OPEN DISCOVERY Home page (or Case Management on the main menu located in the left pane).

  2. Take one of the following actions as needed:

    • Click corresponding to the needed managing client and click Edit Managing Client.

    • Click corresponding to the needed client and click Edit Client.

    • Under Early Data Assessment Environment, deselect Use System Default.

    • Enter the desired Search Endpoint and API Endpoint for that client.

    • Click Save.

Note: You cannot configure the Early Data Assessment Search Endpoint when creating a new client, only by editing an existing client in the Case Manager.

Closed8. Create LIVE EDA Case in OPEN DISCOVERY

A LIVE EDA case is created in the Case Management module of OPEN DISCOVERY and allows you to perform searches on live content across multiple repositories and promote the relevant data to your LIVE EDA Review case. See Create LIVE EDA Case for details.

When the above has been completed, you must also complete the configuration steps required to make the external, live data sources accessible and searchable in your LIVE EDA cases. For more information about how to complete these configuration tasks, start with Configure Locations. Then, to ensure all users are mapped, consult Configuring User Mapping. To make the live data accessible and searchable in the LIVE EDA case, set up and run the required indexing and archiving jobs in the LIVE EDA Admin UI. Consult Configuring Teams Indexing and Configuring Slack Indexing, followed by Configuring Teams Archiving and Configuring Slack Archiving.


Related Topics

Overview: LIVE EDA