Review a Transcript
The process of reviewing transcripts typically includes the evaluation of transcript content and the marking of important details. Eclipse SE includes various tools to help you review and annotate transcripts. In Eclipse SE Desktop you can:
-
create word indexes
-
apply quick mark highlights
-
add issue tags and notes
-
link to exhibits and external documents
-
jump to annotated entries in the transcript
-
generate transcript reports
You can open a transcript in Eclipse SE using the Case Folders area.
To open a transcript, use the following steps:
-
In the Case Folders pane, on the left side of the Eclipse SE Desktop work area, double-click on the item called Transcripts.
-
If transcript types have been defined for your case, a list of these transcript types will appear underneath the Transcripts item. Double-click on the needed type to expand a list of transcripts underneath it. When you have found the needed transcript, double-click on it.
-
The transcript opens in a new tab and appears in the case table.

|
Note: You can double click a transcript to open it. Alternatively, you can open the transcript directly to a referenced item, such as an issue, by expanding the transcript and respective item folders and double clicking on the page and line reference.
|
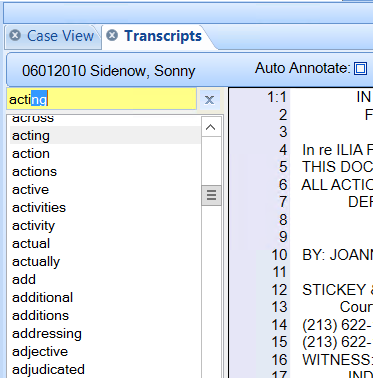
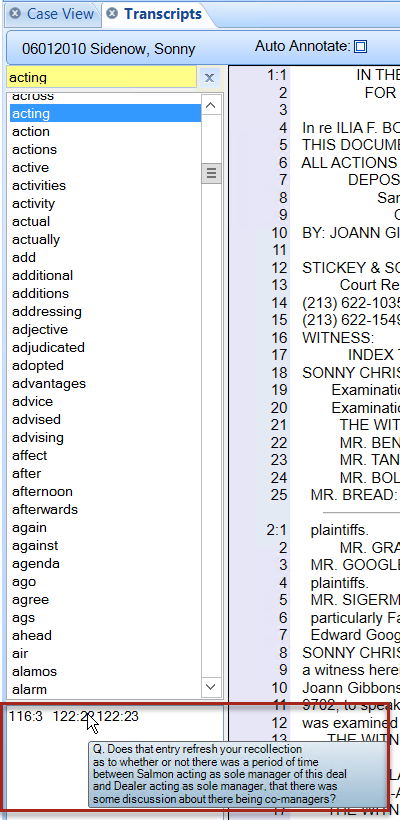
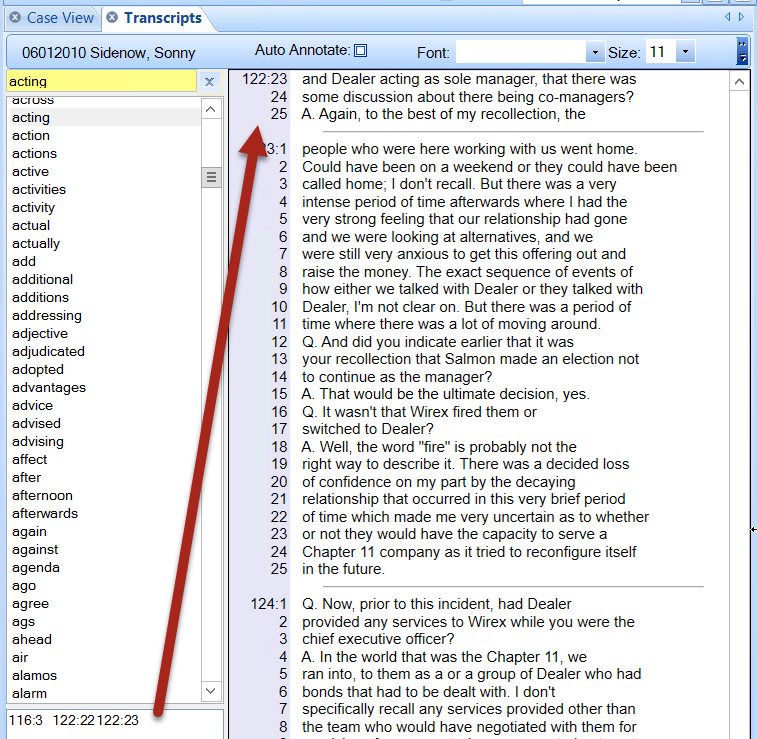
The Word Wheel is an index of words and numbers in the transcript, along with their corresponding page and line numbers. The Word Wheel is located on the left side of the Transcript tab.
After opening the needed transcript, use the Word Wheel as follows:
-
In the Word Wheel “find” field (which is yellow), enter the needed word (or punctuation and/or number). The word highlights in the index.
-
If the correct word highlights:
-
Hover your cursor over a page/line entry in the bottom of the Word Wheel.
-
Read the excerpt in the tooltip.
-
Click the page/line entry to jump to the location in the transcript where the word appears.
-
Repeat these steps for other instances of the word.
-
If the correct word does not highlight, then the word does not exist in the transcript. In this case, enter another term of interest.
A “quick mark” is a simple place marker – a yellow highlight of line numbers in the transcript’s margin, as shown in the following figure. In addition to providing visual cues, you can generate a report that summarizes quick marks.
To add a quick mark, click line numbers of the transcript content you want to mark.
|
|
Note: If you click on an existing quick mark, the quick mark will be removed.
|
You can open the transcript directly to the page:line reference of a note, issue, quick mark, or other transcript annotation.
To open directly to the page:line reference of an entry in a transcript, use the following steps:
-
Expand the Transcripts item in the Case Folders pane by clicking the plus icon to the left of it.
The transcripts added to the case appear in a tree view in the explorer.
-
Expand the appropriate transcript, and then expand all the items underneath that transcript until you reach the needed page:line reference entry.
-
Double-click on the page:line reference.
If the corresponding transcript is not already open, the transcript opens and scrolls to the page:line reference selected.
You can apply an issue type to selected text in a transcript using the Transcript Annotations pane on the left side of the Desktop work area.
To apply an issue type to page and line references in a transcript, open a transcript in a case and follow the steps below:
-
Click on the Transcript Annotations tab in the bottom-right corner of the Eclipse SE Desktop work area. The Transcript Annotations tab is located beside the Doc Tags and Page Tags tabs.
-
Click and drag to select a page and line range within the transcript.
Then right-click and select Annotate.
-
Select an issue from the list on the Transcript Annotations tab by checking the box next to the name of the issue type.
The issue type is applied to the selected lines in the transcript.
Add a New Issue Type
If you are annotating transcripts, you can also create
new issue tags if needed for your review. To create new issue tags:
-
After opening the needed
transcript, make sure the Transcripts
tab is visible in the documents pane.
-
Show/pin the Transcript
Annotations tab.
-
Review existing issue tags—note
the naming and color conventions used.
-
Right-click in the issue
tags list and select Create new issue.
-
Following existing conventions,
enter a name for the new issue and click  to select
a color for the issue. If a custom color is needed:
to select
a color for the issue. If a custom color is needed:
-
Click Define
Custom Colors in the Color dialog box.
-
Click the needed
color on the color palette or enter an HSL or RGB color code.
-
When the color
is created, click Add to Custom Colors
and then OK.
-
When finished, click OK.
-
Communicate details about
the new issue tag to other transcript reviewers.
Add a Note
To add a note to a transcript, open a transcript in a case and follow the steps below:
-
Click on the Transcript Annotations tab in the bottom-right corner of the Eclipse SE Desktop work area. The Transcript Annotations tab is located beside the Doc Tags and Page Tags tabs.
-
Click and drag to select a page and line range within the transcript.
Then right-click and select Annotate.
- Once the annotation has been applied, click into the text box in the Note section of the Transcript Annotations tab. Type your note into the text box. A small yellow note icon appears on the transcript to the left of the starting page and line reference.
Edit a Note
To edit a note applied to your transcript, follow the steps below:
-
Expand the Transcripts item in the Case Folders pane by clicking the plus icon to the left of it.
The transcripts added to the case appear in a tree view in the explorer.
-
Expand the appropriate transcript, and then expand the Notes item underneath that transcript.
-
Locate the note you need to change and double-click on the page:line reference.
If the corresponding transcript is not already open, the transcript opens and scrolls to the page:line reference selected.
- Click the small yellow note icon on the left side of the transcript.
- The Transcript Annotations pane opens on the right side of the work area. Edit the note by changing the text in the Note text box on that pane.
You can link review documents or external files to specific locations in a transcript.
To add a link, open a transcript and follow the steps below:
-
Locate a specific area in the transcript where you want to add the link. Click and drag across that area to select the page and line range within the transcript.
Then right-click and select Annotate.
- Click on the Transcript Annotations tab in the bottom-right corner of the Eclipse SE Desktop work area. The Transcript Annotations tab is located beside the Doc Tags and Page Tags tabs.
- At the bottom of the Transcript Annotations tab, click the pencil icon next to External Link, if adding an external link to the transcript, or next to Document Link, if adding a link to a document already processed into the Eclipse SE system.
- A pop-up window appears. Navigate to the needed file, select it, and click Open (if adding an external link) or OK (if adding a Document Link). A paperclip icon appears to the left of the page and line reference where the link was added.
To remove an annotation (including a note, link, or issue tag), open a transcript and follow the steps below:
-
Expand the Transcripts item in the Case Folders pane by clicking the plus icon to the left of it.
The transcripts added to the case appear in a tree view in the explorer.
-
Expand the appropriate transcript, and then expand all the items underneath that transcript until you reach the needed page:line reference entry.
-
Double-click on the page:line reference.
If the corresponding transcript is not already open, the transcript opens and scrolls to the page:line reference selected.
- Right-click on the highlighted text for the annotation you would like to remove.
- A context menu appears. Select Delete. The annotation is removed from the transcript.
Related Topics
Overview: Transcripts
Add, Edit, or Remove a Transcript
Run a Report
 Open a Transcript