Overview: Eclipse SE Desktop User Interface
Eclipse SE contains all of the components you will use to find, view, and review case details and documents. When you start Eclipse SE Desktop, you will typically open a specific case or a review batch. The Eclipse SE workspace will fill with several different panes of information as described in the sections that follow.
Much of the workspace can be customized to help you work efficiently and comfortably. We recommend that you use Eclipse SE as configured “out of the box” until you become familiar with its components and features. Once you are used to the default settings, you will have an idea of the customizations you want to make.
You can customize the layout of components in the workspace to best suit your preferences and needs.
|
|
NOTE: The ability to customize the workspace is a privilege that can be allowed or restricted by an administrator. If you are not able to perform the custom activities explained in this online Help, such as moving components or creating a custom workspace, you may want to discuss the privilege with your administrator. |

The Eclipse SE Desktop workspace includes the following components.
- Eclipse SE Button
- Main Desktop Toolbar
- Documents Pane
- Document Details Pane
- Slideout Panes
- Navigation Bar
 For more information about the Eclipse SE Desktop user interface, view the
 ![]() Workspace Navigation video.
Workspace Navigation video.
Eclipse SE Button
There are a number of options available when you click the Eclipse SE Desktop button.

When you click on the Eclipse SE Desktop button, a menu bar appears with a list of options:

The menu options correspond to tasks you can perform in Eclipse SE Desktop.
-
Case Management: Open a case or open a batch.
- Edit Tools: Use Global Replace tool. For more information, see Use the Global Replace Function .
- Reports: Run case reports. For more information, see Overview: Reports.
- Export Data: Export case data or replicate a case. For more information, see Overview: Export and Replicate.
- Settings: Work with the layout and/or color scheme for the Eclipse SE Desktop workspace. For more information, see Customize the Eclipse SE Workspace.
- Reset Document Views: Resets the Document Views to the default layout.
-
Exit Case: Click to quit Eclipse SE Desktop.
-
Help: Check current product release details and access online Help on the Ipro Help Center.
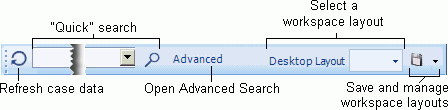
Main Desktop Toolbar
The following image shows the toolbar for the main Eclipse SE workspace.
Documents Pane
Main toolbar

Left Side
The documents pane in the left center area of the workspace contains, by default, the Case View tab. This tab is required and presents the case data table. It includes field data (such as image keys, author, file name, and so forth as defined by your administrator). The Case View tab appears in the left center section of the workspace when you open a case or a batch.
Optional:
-
Search results: Tabs containing results of your searches; one tab for each search.
-
Private Folders: Tabs listing records you have added to Private Folders. Tab names include the folder names.
-
Smart Folders: Tabs listing records you have defined in Smart Folders. Tab names include the folder names.
Use the following toolbar, located above Case View or related tabs, to go to a specific image key or record number and to choose the font size and/or number of documents per record set (grid size).

Right side (Record View)
The right side of the documents pane displays a “coding form,” which contains a set of fields for the record selected in the left side of the documents pane. Record View is not visible by default—to view it, select the Record View option.
The fields that are included are defined by your administrator or may be user-defined. As the name implies, the coding form in Record View is typically used to edit or enter data for the listed fields. Record View can be undocked.
Slideout Panes
Slideout panes can be “hidden” (minimized) so that only the tabs are visible, thereby making more room for the documents and/or document details pane. Clicking the tab of a hidden slideout pane opens it.
-
Left slideout pane
By default, the left slideout pane contains the following tabs:
-
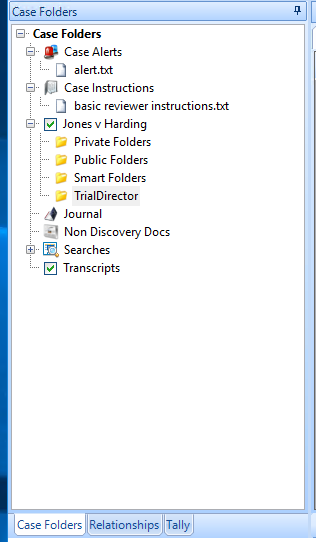
Case Folders: Organizational tools that provide a place for needed information (files or specific records of the case) to assist with case reviews.
-
Relationships: Shows the parent-child relationship of documents associated 2 with the selected record. If no relationships are defined, or you are working in a batch and related documents are not included, then this tab will be blank.
-
Tally: Displays results after a tally request is made. Users can also export or print tally results. “Tallying” a column displays the total number of instances of a value for a particular field.

-
-
Right slideout pane
By default the right slideout pane contains the Doc and Page Tags tabs, which contain the tags reviewers will apply to each document and/or page in their case.


Document Details Pane
By default, the right center of the Eclipse SE Desktop workspace includes the document details pane with the Image, Extracted Text, Quick View and Production History tabs visible.

This pane includes different views of files and data available for each document in your case, including:
-
Image - The TIFF (or BMP, JPG, PCX, PDF, or PNG) file associated with a selected case record. Annotations (such as redactions, highlighting, or sticky notes) are made in this view. The Image tab supports the transparent or cross-hatch view for redacted information and the highlighting of search terms on the image.
-
Extracted Text - The OCR or extracted text associated with the selected record. This tab will be blank if no field in the Eclipse SE database is defined as EXTRACTEDTEXT. In some cases, extracted text may not exist. If you believe it should exist for a particular document, see your administrator.
-
Quick View - This tab presents the native file for the document. This tab will be “empty” if no field in the Eclipse SE database is defined as NATIVE, or if no native file exists for a particular document. If you believe it should exist, see your administrator.
-
Production History - If documents within the current case or batch have been produced, the produced document for a selected record displays on this tab. If the selected record's document has not been produced, no information will be included.
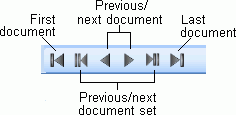
Navigation Bar
The Navigation Bar is located at the bottom of the Eclipse SE Desktop workspace. It allows you to move between documents and document sets.
Related Topics
Last Revision: 6/2/2023
Version: 2019.0.0