
Manage Existing Media
In Media Manger, you can manage existing media (media you have already created/defined) via the Media tab. Media can be added to deliveries or managed independently of deliveries.
View and/or Save Media Details, Images and Attachments
Complete the following steps to view a media entry’s details, images, or attachments:
-
On the Media tab, double-click the media of interest or click the corresponding
 .
. -
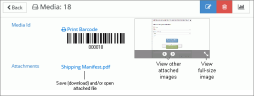
To view an attached image, point to the image and use the image taskbar buttons available for viewing, as shown in the figure below.
-
Depending on your browser and its security settings, you may be able to save an attached image. Following is one Internet Explorer method:
-
Ensure the image to be saved is visible in the image area.
-
Right-click the image and select Save picture as.
-
Complete the Save Picture dialog box and click Save.
-
-
Depending on your browser and its security settings, you may be able to open and/or save an attached file:
-
If your browser is configured to download files automatically, click the attachment link in Media Manager; the file will be downloaded to the location specified for your browser. In this case, open the file in the download location to view it.
-
If your browser is configured to prompt you before opening and/or downloading files, follow the prompt as needed.

Note: Refer to your browser documentation and/or check with your IT Department for details on security and/or download settings.
-

Modify Media Details
Details for an existing media entry can be modified at any time. To change details for an existing media entry:
-
Ensure you have correct information and know your firm’s conventions for media details.
-
In Media Manager, click the Media tab.
-
Locate the needed media in the Media list.

See Grids for details on sorting, filtering, and/or searching in the list.
-
Double-click the media to be changed or click the corresponding
. -
In the Media form, click
 .
. -
Make needed changes. This includes changes to attached images or files such as:
-
Changing the default image
-
Adding one or more images or attachments
-
Deleting one or more images or attachments
Review the steps in Create New Media for details.
-
-
When finished, click Save. If you deleted any images or attachments, click OK in response to the confirmation message.
Delete Media
Any media entry can be deleted. To do so:
-
In Media Manager, click the Media tab.
-
Locate the needed media in the Media list.
See Grids for details on sorting, filtering, and/or searching in the list.
-
Double-click the media to be deleted or click the corresponding
. -
Click
 in
the Media details form.
in
the Media details form. -
In response to the confirmation message, click OK.
Note: Your browser may include an option in the confirmation message that says, for example, "Prevent this page from creating additional dialogs." If your browser includes such an option, do not select it.
Related Topics