Publish and Distribute a Case
Overview
About publishing
Ipro Publish is a companion application that allows you to create a runtime version of Eclipse SE Desktop for a single case. You can use an active case, a .DLF or other load file as the source of the Ipro Publish case.
Cases can also be published as read-only, to allow users to view, but not change, a case.
Complete the following procedures to publish cases.
Limitations
The following functions are not available in published cases:
-
TIFF-on-the-Fly
-
Scanning
-
Merge/Split Documents
-
View History
-
Import Transcripts
Preparation
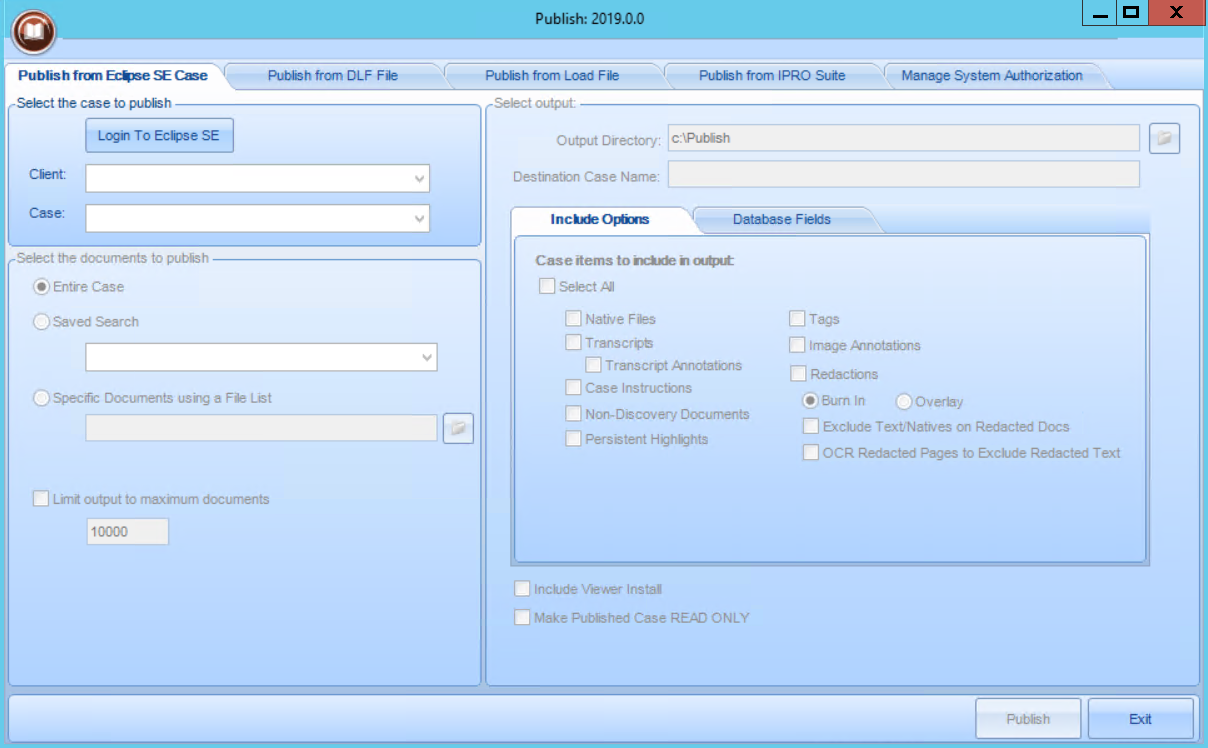
Before publishing a case, review Ipro Publish options:
-
Open Eclipse Administration.
-
In the navigation panel, expand the Import/Export menu.
- Click Publish Data.
- The Ipro Publish module displays.
-
In Ipro Publish, click the tab corresponding to the source of data to be published:
-
Publish from Case
-
Publish from .DLF file (for Eclipse SE)
-
Publish from Load file (for any other type of data)
-
-
Review the options and information you will need.
-
Gather needed details and take required actions. For example:
-
To publish a case based on a saved search, ensure the needed search has been saved.
-
To publish a case from a load file, ensure that you have the needed files (such as .CSV, .DAT, or .TXT plus .LFP).
-
-
Continue with the appropriate procedure:

Publish an Eclipse SE Case
To publish data from a case:
-
Complete Preparation.
-
In Ipro Publish, click the Publish from Eclipse SE Case tab.

-
Select the needed client and case (available clients/cases are based on your credentials and assignments).
-
Select the documents to be published:
-
type the full path and filename of the needed file, or
-
click
 to select the file, then click OK.
 - Select output details:
-
Burn in: Redactions are integrated into image and cannot be edited.
-
Overlay: Redactions are included as Eclipse SE components that can be edited.
-
Exclude Text/Natives on Redacted
Docs: If redactions are burned in, do not publish extracted text and/or native files. -
OCR Redacted Pages to Exclude Redacted Text: If you choose the previous (“Exclude”) option, you can select this option to re-OCR your text files to include all text that is not redacted. Selecting this option may impact the efficiency of the publish process.
- When all items have been selected, click Publish. Wait as the case is published.
- After the case is published, make it accessible to the reviewer(s) who should have access to it as explained in Distribute a Case.
|
Option |
Description |
|
Entire Case |
Select this option to publish all documents in the case. The total number of documents displays at the bottom of the tab. |
|
Saved Search |
Select this option and choose the needed search to publish a set of documents matching the criteria of the saved search. |
|
Specific Documents using a File List |
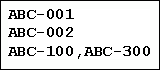
Select this option to publish a set of documents listed in a plain text file (details below). In the corresponding field: The file should include one image key per line and/or one range of image keys per line. Indicate a range with a comma. For example, consider a set of single-page documents beginning with image key ABC-001. To produce the first two documents along with documents 100 through 300, the file would include the lines shown in this figure. |
|
Limit output to maximum documents |
After selecting the main document set, choose this option to limit the set to a maximum number of documents. (Documents are counted beginning with the first document in the set.) This is the total number of documents, not pages. (If you enter 100, for example, and each document has 10 pages, then the total will be 1,000). |
|
Option |
Description |
|
|
Output Directory |
Enter the full path for the folder in which you want the published file(s) to be placed. Or, click the |
|
|
Destination Case Name |
Enter a name for the case. Avoid characters that are not allowed in Microsoft Windows, such as backslash or colon. |
|
|
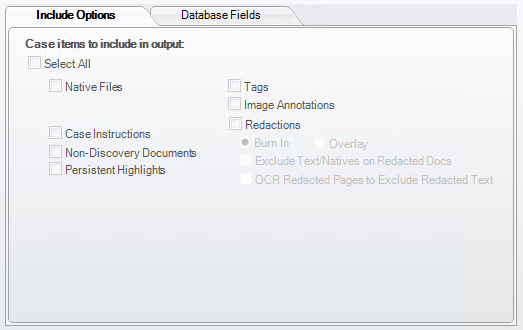
Include Options tab
|
Select the case components to be included with the published case, as shown in the following figure. See also notes following the figure.
Redactions If you include redactions, select the way they will be included in the image: Tags If you include tags, after you select the option, click the Select Tags tab and select the tags to be published. |
|
|
Database Fields tab |
Select all or some of the fields in the case. The BEGDOC field is included by default; all others are optional. |
|
|
Include Viewer Install |
Select this option if intended recipients of the published case do not have Eclipse SE; a standalone version of the application will be included.
|
|
|
Make Published Case READ ONLY |
Select this option if users should be able to view documents but not modify them in any way. |
|

Publish from a .DLF File
Complete the following steps to publish data using a .DLF file. Note that system field types that do not exist in Eclipse SE will be defined with an appropriate field type. (For example, the HASIMAGE field will be a SINGLE_VALUE field in the published case.)
-
Complete Preparation.
-
In Ipro Publish, click the Publish from .DLF File tab. Review the tab to ensure that you have the needed details and files.
-
Enter needed input details:
-
Select output details:
-
When all items in the Publish from .DLF Loadfile tab have been addressed and reviewed, click Publish. Wait as the case is published.
-
After the case is published, make it accessible to the reviewer(s) who should have access to it as explained in Distribute a Case.

|
Item |
Description |
||
|
Case Definition (.CSE) file |
For each of these entries, enter the full path and name of the listed file. Or, click the
|
||
|
Data (.DLF) file |
|||
|
Volume (.DLF) file |
|
Option |
Description |
|
|
Output Directory |
Enter the full path for the folder in which you want the published file(s) to be placed. Or, click the |
|
|
Destination Case Name |
Enter a name for the case. Avoid characters that are not allowed in Microsoft Windows, such as backslash or colon. |
|
|
Case Items to Include in Output: Select available options as needed. |
||
|
Native Files |
Include native files associated with the case. |
|
|
Make Published Case Read Only |
Select this option if users should be able to view documents but not modify them in any way. |
|
|
Include Viewer Install |
Select this option if intended recipients of the published case do not have Eclipse SE; a standalone version of the application will be included. |
|
|
Burn-in |
Redactions are integrated into image and cannot be edited. If this option is not selected, redactions will be included as Eclipse SE components that can be edited. |
|
|
Exclude Extracted Text/Native Files on Redact-ed Documents |
If redactions are burned in, select this option to omit extracted text and/or native files from the published case. |
|
Publish from a Load File
Publish a case from a .CSV, .DAT, or .TXT load file, plus a corresponding .LFP file, as follows:
-
Complete Preparation.
-
In Ipro Publish, click the Publish from Load File tab.
-
Review the tab to ensure that you have the needed details and files.

-
Input: Enter and/or select needed input details:
-
Output: Enter and/or select the following details:
-
Basic options: Select from the following options:
-
Click Modify next to the Stopwords field.
-
In the Modify Stop Words dialog box, select the source of words to be excluded (or skip to step 3 to enter the words manually):
-
Load Default Stop Words: Click this button to include a basic set of 128 common words.
-
Load from File: Click this button to select a .TXT file containing the needed stop words. In the file, words may be included on separate lines or separated by spaces. When the file is loaded, words will be listed in the Modify Stop Words dialog box.
-
-
As needed, add (one word per line), delete, or change words in the Modify Stop Words dialog box.
-
When finished, click Save in the dialog box. The number of words you have defined displays in the Stopwords field.
-
mm/dd/yyyy
-
dd/mm/yyyy
-
yyyy/mm/dd
-
yyyymmdd
-
Record Delimiters: Ensure that delimiters are correctly defined and fields are being populated correctly:
-
Review the field Sample Data in the bottom portion of the tab.
-
If problems exist with the sample data, take one or more of the following actions as needed.
-
Select or clear the First Line Includes Headers option.
-
Evaluate the delimiters listed in the Record Delimiters area and change as needed. Choose Default .CSV or .DAT delimiters, or custom delimiters if they exist in your file.
-
To apply changes to the sample data, click Load/Refresh Data Fields.
-
To evaluate data for another record, click Next (or Prev) Record. Repeat if needed to ensure data is correct.

NOTE: Clicking this button re-loads original load-file data. If you click it after you complete step 8, a warning will allow you to either return the original data or to cancel the action.
-
-
Fields: Ensure that only the fields needed in the published case are included and that field type and proper indexing/sort options are selected. Proper field definition is particularly important for system fields (BEGDOC, EXTRACTEDTEXT, etc.), and ensures that users can work effectively in the published case.
Unneeded fields
-
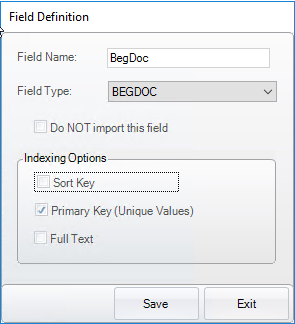
Double-click a field that is not needed. The Field Definition dialog box opens as shown in this figure.
-
In the Field Definition dialog box, select the Do NOT import this field option.
-
Click Save.
-
Repeat steps a–c for each field to be excluded.
Field definitions
-
Double click a field for which the definition needs to be modified.
-
In the Field Definition dialog box:
-
Change the field name (typically not done).
-
Select the correct field type, see Edit Database Fields
-
Select sorting and/or indexing options. See Field options and flags for details.
-
-
Click Save.
-
Repeat steps e–g for each field to be defined.
-
Once the EXTRACTEDTEXT field is defined as such, select the Extracted Text field contains File Name option if the data load file (.DAT or .CSV file - not .LFP file) for your case includes a path/filename for text files instead of actual text in the field.
-
When finished, review the field list to ensure all details are as intended. The following figure shows an example.
-
-
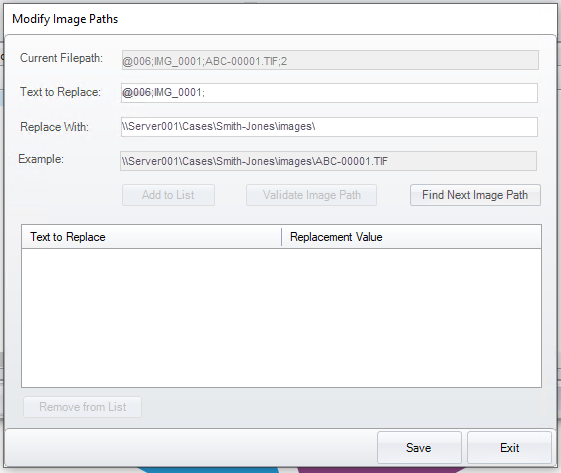
Image File Paths: Ensure path information for image files is correct:
-
At the bottom of the tab, click Modify File Paths.

-
Review the current Filepath (the path in the load file).
-
If the load-file path matches the current file location, skip to step h. If the path is not correct, in the Text to Replace field, enter the part of the path that needs to be corrected (for example, an incorrect network path or volume designator).
-
In the Replace With field, enter the correct path.
-
Click Validate Image Path to ensure that the entry is correct. The following example shows a typical correction.
-
Click Find Next Image Path to search for another path in the load file.
-
If another path is found, repeat these steps to correct the next path and search for other paths.
-
When all paths have been found, click Save.

-
-
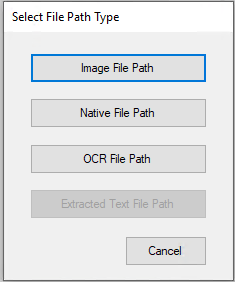
Native File Paths: If your case includes native files, repeat step b, except click Native File Path in the Select File path Type dialog box.
-
Text File Paths: If your case includes text files, repeat step b, except click one of the following buttons in the Select File Path Type dialog box:
-
OCR File Path: If text files are defined in your .LFP file, click this button to verify/correct the file path for the text files.
-
Extracted Text File Path: If you selected the Extracted text field contains File Name option, click this button to verify/correct the file path for the text files.
-
-
When all items in the Publish from Load File tab have been addressed and reviewed, click Publish. Wait as the case is published.
-
After the case is published, make it accessible to the reviewer(s) who should access it as explained in Distribute a Case.

|
Item |
Description |
||
|
Input Load File |
For each of these entries, enter the full path and name of the listed file. Or, click the
|
||
|
Input .LFP file |

|
Item |
Description |
|
|
Output Directory |
Enter the full path for the folder in which you want the published file(s) to be placed. Or, click the |
|
|
Case Name |
Enter a name for the published case. Avoid characters that are not allowed in Microsoft Windows, such as backslash or colon. |
|
|
Item |
Description |
|
Make Published Case Read Only |
Select this option if users should be able to view documents but not modify them in any way. |
|
Include Viewer Install |
Select this option if intended recipients of the published case do not have Eclipse SE Desktop; a standalone version of the application will be included. |
|
Burn-in Redactions |
Select this option to integrate redactions into image so that they cannot be edited. If this option is not selected, redactions will be included as Eclipse SE components that can be edited in the published case. |
|
Use White |
Select this option if you are burning in redactions and want all redactions to be white. |
|
Exclude Text/Native on Redacted Docs |
If redactions will be burned in, select this option to omit extracted text and/or native files from the published case. |
|
Stopwords |
To exclude common words from searching in the published case: |
|
Import Date Format |
If dates in your load file are in one of the following formats, select the format from this list to define the field as the DATE field type instead of as plain text (SINGLE_VALUE field type): DATE fields support sorting, tallying, and other actions. If the dates in your load file do not match the listed formats, or you want dates to be treated as plain text, select None. |

Distribute a Case
After a case is published, the person responsible for managing the published case should distribute the case to intended recipients. Recipients can then review the case or simply view the case. If, during the publish process, the Make Published Case READ ONLY option was checked, the user can only view the published case in Eclipse SE Desktop viewer. If this option was not checked, the recipient can review the case in Eclipse SE Desktop or the Eclipse SE Desktop viewer.
Administrator Steps
-
Ensure that the published-case folder is in a location that is accessible to the recipient, such as in a network location. The recipient must be able to copy the published-case folder to their computer and use it on their local drive.
-
Provide recipient with case-specific instructions, for example:
-
Where the published-case folder resides.
-
Which activities should be completed (viewing, redacting, tagging, etc.).
-
If Eclipse SE Desktop (the full application) is installed at the recipient’s site, how he or she should log in to the published case.
NOTE:
-
User actions in a published case are tracked for history reporting purposes. If the user opens the published case without entering credentials, the user will be identified as “Publish” in history reports.
-
Users will be able to create private tags for their own use.
-
Restrictions to user privileges are not recognized when users are reviewing a published case.
-
If applicable, details on a) exporting the reviewed case (i.e., what content to export) and b) returning it to the person managing the published case.
-
-
Instruct the recipient to complete the following steps.
Recipient Steps
Recipients of a published case will use one of the following programs to review a case:
- A full version of Eclipse SE that is available at their site.
- Not all Eclipse SE features are available for published cases; see Limitations.
- Eclipse SE Desktop viewer must be used if a case is restricted to view-only
Administrators should explain which version reviewers will be using and also provide the following procedure.
To review a published case:
-
Open the case.
To open case in Eclipse SE:
-
When the case was published, a Publish directory was created. You will be notified that a case has been published and the location of the directory.
- Using Windows Explorer, navigate to the Publish directory and double-click on the EM! file. This will open the published case in Eclipse SE.
To open the case in the Eclipse SE Desktop Viewer:
- Open the folder containing the published case files.
- Double-click LaunchViewer.exe.
- Select the needed case and click Open.
-
-
If the published case data/files are on a DVD or CD (or are read-only), you will be alerted to copy the files to your local drive. If this occurs, follow the onscreen prompts to select an appropriate local folder for the files. The copied files will be used for the review.
-
Review the case. For assistance on using Eclipse SE Desktop, see Workflow: Review a Case.
-
When review of the published case is completed, export case files and return them if so instructed.
Related Topics
Last Revision: 6/2/2023
Version: 2019.0.0