Manage Coding Forms
By default, the Record View pane and the case table (Case View, etc. tabs) display all fields in a case. Hundreds of fields may be defined in your cases, while only a few are needed for users to perform a particular task.
Case Management allows you to create various field sets (“coding forms”) so that the fields listed on the Record View pane and in the case table meet users’ needs and allow them to work as efficiently as possible. Coding forms also dictate which tags appear in the Doc/Page Tags tabs. They can also specify a sort order for the case table, be limited to specific users, and be coordinated with review passes.
You can specify one or more coding forms as the default form that will appear when a user first opens a case or batch.
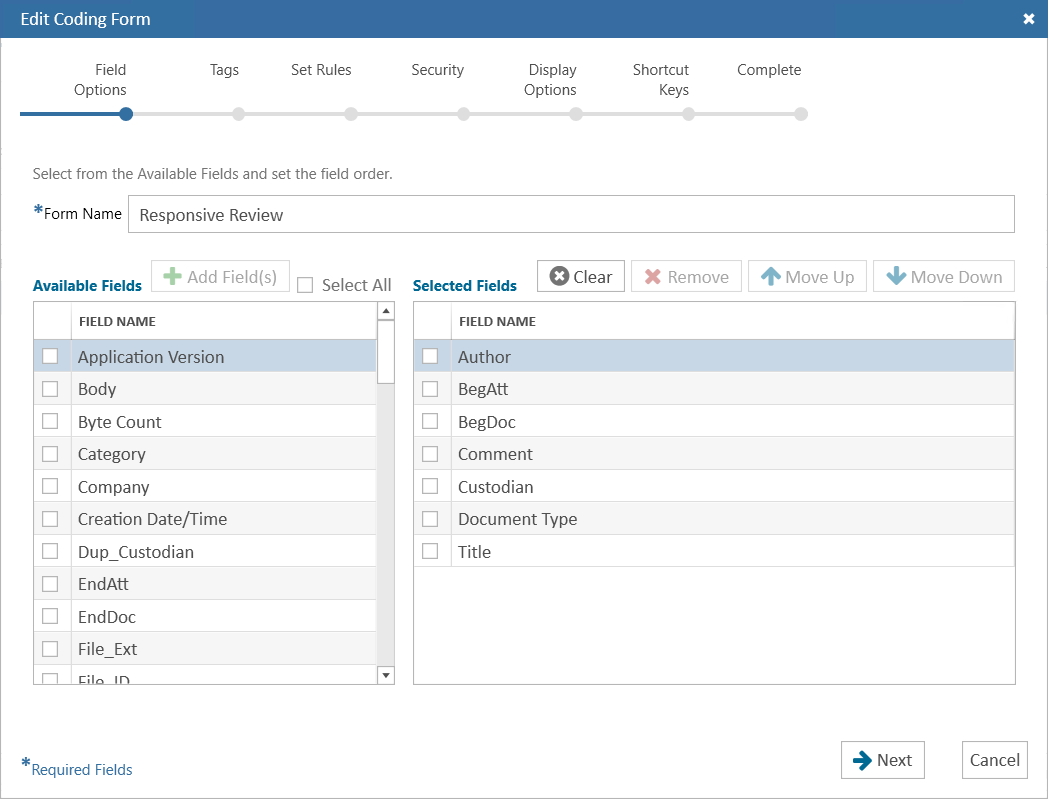
In the following example, the “Responsive Review” form includes just seven fields.
Planning
As with many tasks, proper planning will help ensure that the coding forms you define match needed case review activities.
-
Names: If several coding forms will be available for users, give some consideration to naming conventions.
-
Fields and tags: Identify the sets of fields and tags that will best serve case review. Also:
-
Shortcut keys can be defined for fields—if they will be used, plan shortcuts that will be easy for reviewers to use and remember. Shortcut keys can also be defined for tags (see Tag options). Tag shortcuts can be used case-wide; field shortcuts are specific to coding forms.
-
A multi-field sort index can be specified to provide an initial sort order for fields in the case table (see Manage Multi-Field Sort Indexes).
-
Rules: Determine whether rules should be defined to enforce certain review actions. Basic “if-then” rules can be defined regarding tags, tag groups, and/or fields to enforce record tagging and/or editing requirements. Or, fields, tag groups, and/or tags can simply be defined as required.
-
Date fields: Determine whether a range of dates should be defined to help reviewers identify and correct errors in DATE fields.
-
Review coordination: If the completion of certain review activities can indicate completion of a batch review, identify needed rules and review passes that should be coordinated.
-
Security: Determine whether forms should be restricted to certain users and/or user groups.
-
Default forms: Decide whether one or more forms should serve as the default form for the case.
Finally, consider the information users will need in order to properly use coding forms and create case instructions accordingly.
Create New Coding Forms
Review Manage Coding Forms, then create coding forms for a case as follows:
-
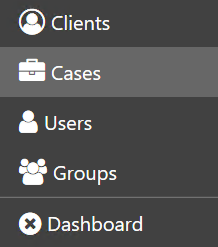
On the Dashboard, click the Case Management module.

-
In the navigation panel, click the Cases tab.

-
Locate the case you would like to edit. Double-click on the case to open the Edit Case wizard.
-
Click the Coding Forms tab. All coding forms for the case appear on this page.
-
To add a new coding form, click the Add Coding Form button in the toolbar. The Add Coding Form wizard displays.
-
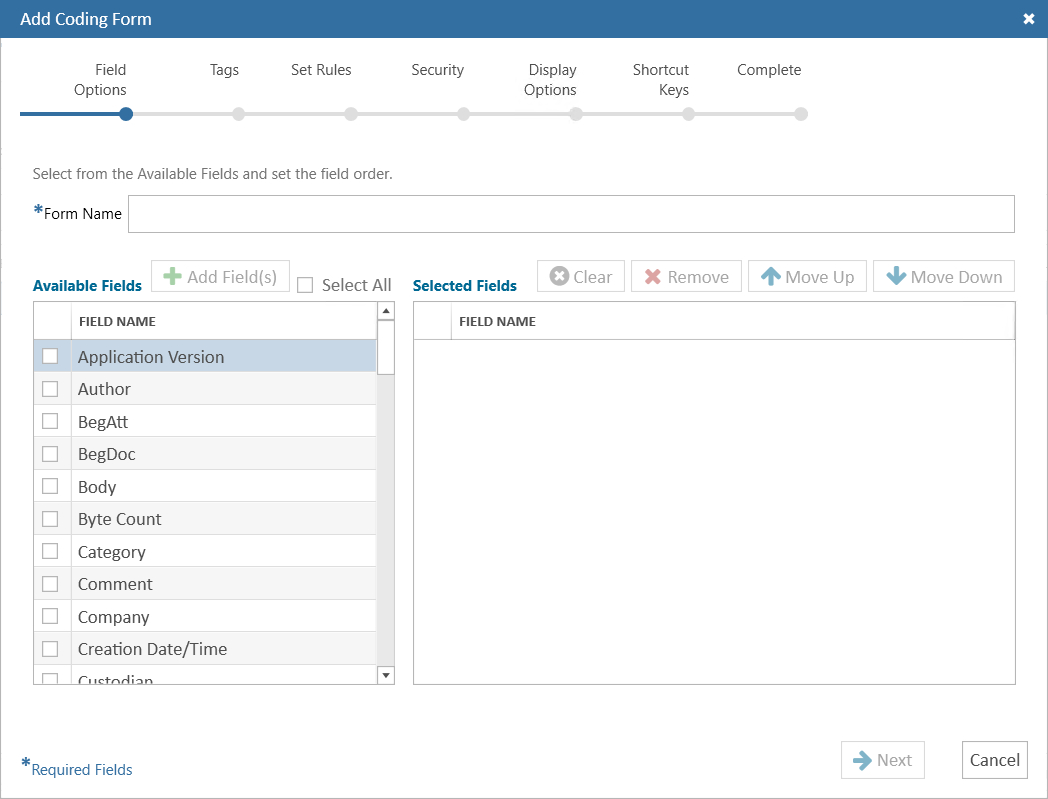
Field Options: On the first step in the Add Coding Form wizard, complete the following procedures:
- In the Form Name field, enter a name for the new coding form.
-
In the Available Fields box, select the fields to be displayed in the coding form (at least one field must be selected). Select the check box for any field you would like to include. To select all fields, click the check box beside the Select All option above the field list.
-
When all fields have been selected, click the Add Field(s) button. The fields are moved from the Available Fields box to the Selected Fields box.

NOTE: The EXTRACTEDTEXT field can be added to a coding form, but will not display in Record View. (It will display in the case table, which by default displays the fields defined in the selected coding form.)
- If needed, you can clear all fields from the Selected Fields box by clicking the Clear button in the toolbar. To remove only certain fields from the Selected Fields box, click the check box for each field to be removed, then click the Remove button.
-
When needed fields have been selected, organize them in a way to best meet your users’ needs:
-
In the Selected Fields list, click the check box of a field that needs to be reordered.
-
Click Up or Down until the field is in the desired location.
-
Repeat these steps to reorder other fields.
- When finished with your field selections, click Next in the bottom-right corner of the dialog box to proceed to the next page.
-
-
Tags: On the second step in the Add Coding Form wizard, define what tags appear in the coding form by completing the following procedures:
-
To select all tag groups and tags, click the check box for the Select All Tags option.
-
To select individual tag groups or tags, click the check box for each needed group and/or tag.
-
If needed, change the order of tag groups by selecting the check box for the group, then clicking the Move Up or Move Down buttons in the toolbar.

Tip: If working with many tag groups and tags, you can simplify the view on this screen by clicking the Collapse All check box. All tags are collapsed under their respective tag groups, so that only the tag group names are viewable. To expand all tag groups again, simply clear the Collapse All check box.
-
When you've finished selecting your coding form tags, click Next in the bottom-right corner of the dialog box to proceed to the next page.
NOTE: If a tag group has the Exclusive rule, all tags in the group must be selected.
-
-
Set Rules: See Define coding form rules for details on setting rules as part of your coding form definition.
-
Security: If the form should be restricted to certain users or groups:
-
To select all groups and/or users, click the Select All check box above the Groups and/or Users list.
- To select individual groups or users, click the check box for each needed group and/or user.
- When finished with your selection, click Next in the bottom-right corner of the dialog box to proceed to the next page.
NOTE: This security applies to a coding form when it is accessed from a case. If a coding form is assigned to a review pass, review pass security will take precedence.
-
-
Display Options: Select other options as described in the following table:
-
Enter Start and End dates for the range. These dates are inclusive.
-
Shortcut Keys: To allow users to use shortcut keys to navigate from one field to another in the coding form, assign the shortcuts as follows:
-
In the Add Coding Form dialog box, click the Shortcut Keys tab.
-
Select a field for which a shortcut key is being assigned.
-
Select the needed key (1-9, A-Z). When working in the coding form, reviewers will be able to press Alt+thiskey to place the cursor in the selected field.
-
Repeat steps b and c for all fields for which shortcuts keys are being assigned.
-
Review and make a note of the shortcut keys so that you can relay details to reviewers who will be using the coding form.
-
-
When all tabs in the Add Coding Form dialog box have been completed, click Save.
-
Repeat this procedure to configure other coding forms.
-
Explain coding form use to reviewers and/or add applicable case instructions.


|
Option |
Description |
||
|
Optional Date Range |
Complete the following steps to check all DATE fields that appear in the coding form against a specific range of dates. When a range is defined and the coding form is selected in Review, a message will appear in the status bar to alert users when a date is out of range.
|
||
|
Default View |
To have the coding form serve as the default coding form for the case, select the Use For Default Case View option. When this option is selected, the coding form displays when a user first accesses Review or chooses Default Layout. By default, the fields in the case table will also match this coding form. More than one form can be designated as the default form, because different users may have different access to a specific form. If more than one default form is available for a particular user, then LOCAL DISCOVERY uses the first available form in the list in Record View as the default. |
||
|
Default Sort Index |
To specify a default sort order for the case table when the coding form is selected, select the needed multi-field sort index. For details on indexes, see Manage Multi-Field Sort Indexes. Users can change field sorting after the coding form is selected; defining a sort index here provides a baseline sort order for the coding form. |
|
|
TIP: A report listing all defined shortcut keys (for coding forms and tags) for all cases is available; see Shortcut Keys Report. For a report specific to a case, see Use Case Management Reports. |
Define coding form rules
Basic “if-then” rules can be defined regarding document tags, tag groups, and/or fields, to enforce record editing and/or tagging requirements for users working in Record View. (Note: If rules are defined, ensure that users edit fields in Record View, not in the case table.) Fields, tag groups, and/or tags can simply be defined as required. Form rules are enforced when a user edits fields in Record View or applies tags while working in a case or batch. In batches, a user cannot select a new document for review until all rules are met.
Coding forms with rules can also be tied to review passes so that if all rules are met for all batches in a review pass, the status will automatically change to Reviewed.
Rule examples:
- If a particular document tag is set, then a particular field (for example, a Comments field) is required (cannot be empty).
- At least one tag from a tag group must be applied.
Before you add rules to a coding form, plan the rules and rule sequence to ensure that they will correctly enforce the needed review activities and be conducted in the correct order.
To define a coding form rule:
-
On the Dashboard, click the Case Management module.
-
In the navigation panel, click the Cases tab.
-
Locate the case you would like to edit. Double-click on the case to open the Edit Case wizard.
-
Click the Coding Forms tab. All coding forms for the case appear on this page.
-
To define rules in a new coding form, click the Add Coding Form button in the toolbar. To define rules for an existing coding form, select the coding form in question, then click the Edit Coding Form button in the toolbar.
-
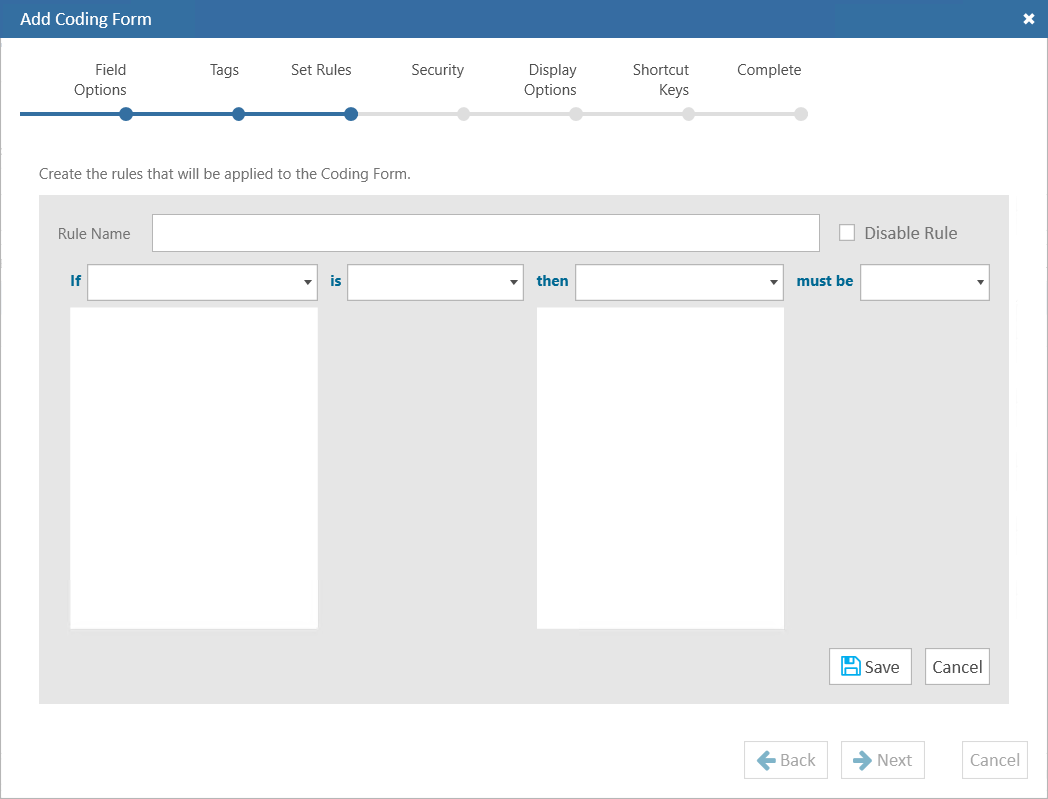
In the wizard that opens, click the Set Rules tab.
- On the Set Rules page, click the Add button in the toolbar. Configure the new rule for the coding form as described in the following steps.
-
Rule Name: Enter a name that describes the rule’s purpose.
-
Rule details:
IF statement
-
Select the item type—Tag, Tag Group, or Field—that is the subject of the “if” portion of the rule.
-
Select the specific field, tag, or tag group. Note: Only the fields and tag groups/tags that have been added to the form will be available.
-
Select the needed condition. For example, for tags or tag groups, the conditions are Tagged or Not Tagged. The condition may also be Required.
THEN statement:
-
If you defined an item to be Required, then skip to step h.
-
For other rules, select the item type—Tag, Tag Group, or Field—to which the “then” portion of the rule applies.
-
Select the specific field, tag, or tag group.
-
Select the required condition. For example, for fields, the conditions are Empty or Not Empty.
-
Read the rule statement to ensure it is as intended; make changes if needed.
-
If the rule should not yet be active, select the Disable this rule option.
-
When finished, click Save.
-
-
Repeat these steps to create other rules.
-
When all rules are defined, review the order of rules in the Set Rules tab of the Coding Form wizard. Rules are enforced in order from top to bottom.
-
If the order of rules should be changed:
-
Select a rule to be reordered.
-
Click Move Up or Move Down until the rule is in the desired location.
-
Repeat these steps to reorder other rules.
-
-
Define or revise other aspects of the coding form as needed. When finished, click Next in the bottom-right corner of the wizard until you reach the Shortcut Keys tab. Click Save.

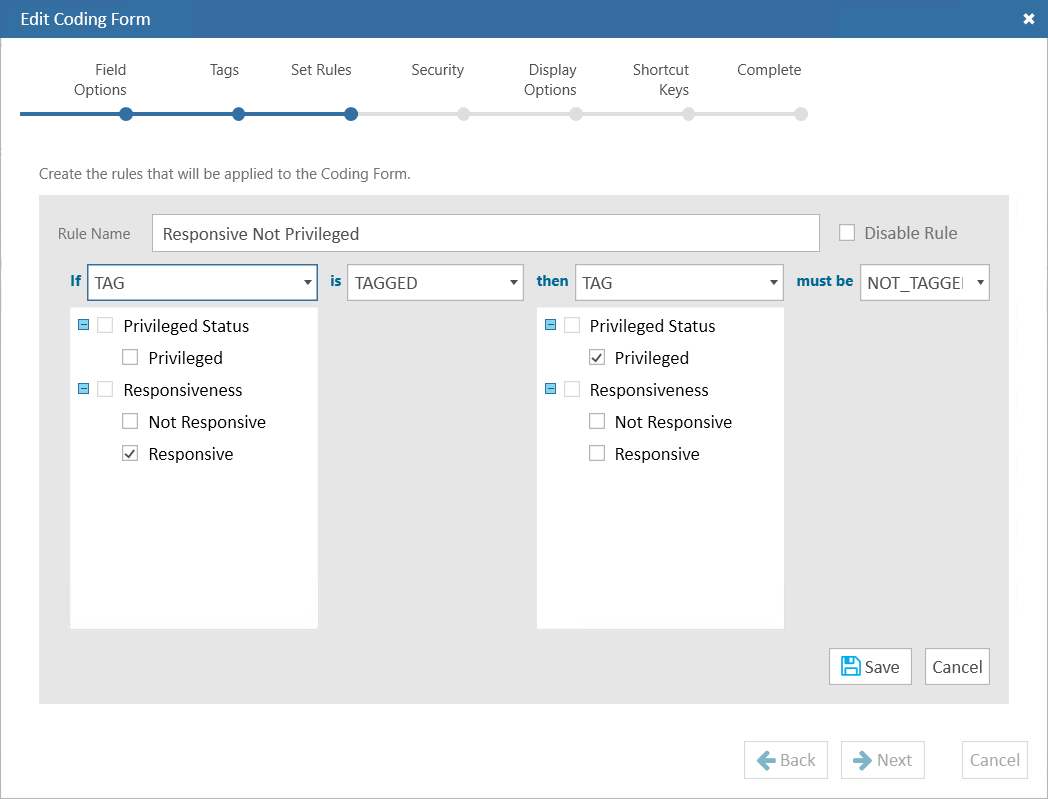
The following example shows a new rule being defined. In this example, if the Responsive tag is applied, then the Privileged tag must not be applied.
Edit or Delete Coding Forms
To revise or delete an existing coding form:
-
On the Dashboard, click the Case Management module.
-
In the navigation panel, click the Cases tab.
-
Locate the case you would like to edit. Double-click on the case to open the Edit Case wizard.
-
Click the Coding Forms tab. All coding forms for the case appear on this page.
-
To modify a coding form, select a coding form in the table and click the Edit Coding Form button in the toolbar. Make needed changes (fields, tags, rules, and/or security) in the Edit Coding Form wizard. Refer to Create New Coding Forms for details on coding form options.
-
To delete a coding form, select the relevant coding form and click the Remove Coding Form button in the toolbar. Note that the coding form is removed immediately.
-
Notify users of the changes that have been made.
|
|
NOTE: Fields, tags, and tag groups that are part of a rule(s) cannot be deleted. |
Related Topics
Version: 2023.8.12
Last Revision: 11/8/2023