
Work with Mass Actions
Mass Actions are actions performed on multiple documents at one time, such as populating coding fields and/or applying tags. Existing permissions apply for mass actions. Mass actions are performed from the Search Results tab or the Relationship Pane in the Document Viewer.
 Select Documents for Mass Action
Perform the following procedure to select multiple documents on the Search Results tab or the Review Grid in the same way all at once.
-
Log in to OPEN DISCOVERY Review .
-
Complete the initial steps to open the Results Grid. See Work with Search Results.
-
Optional: Sort the documents in the Results grid. See Work with the Results Grid Columns for details on sorting, filtering, and so on.
-
All documents: To perform a mass action on all documents in the current document set:
-
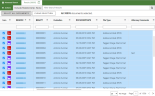
Click SELECT ALL DOCUMENTS in the column header row to select all the documents as shown in the following:
-
Click CLEAR SELECTION to deselect your documents.
-
-
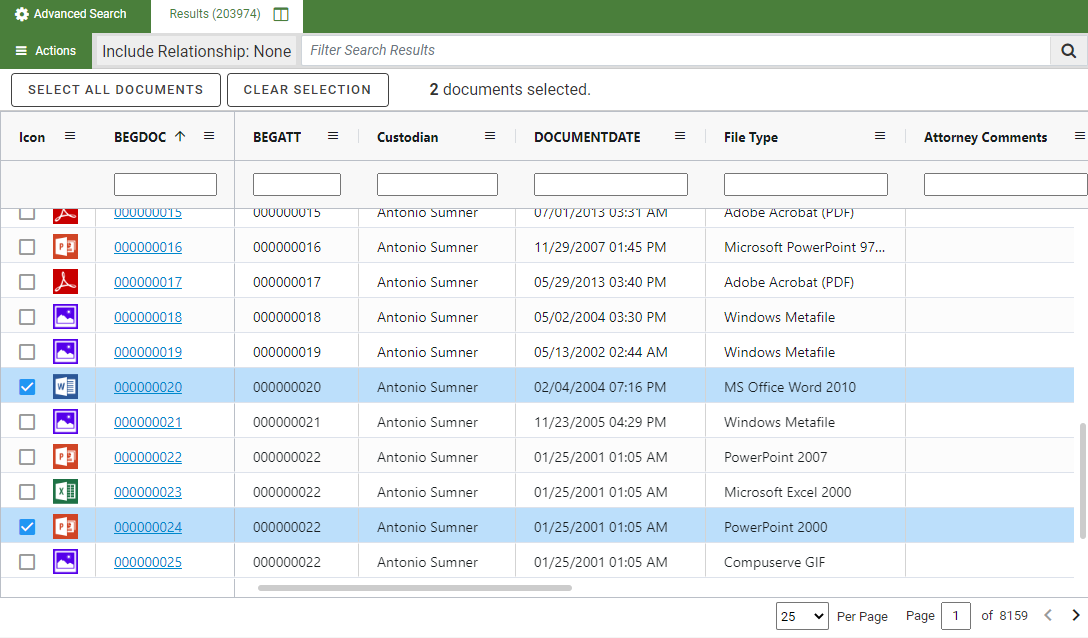
Selected documents: To perform a mass action on selected documents in the current document set, select the check boxes associated with any documents you would like to perform a mass action as shown in the following figure.

-
Select
 in the mass action toolbar, then click the mass action you would like to perform. See the following image:


|
|
Note: Once documents are selected, changing the sort of any grid column will clear all selected documents. |
Tag Multiple Documents
|
|
Note: The following steps refer to tagging multiple documents in the Results grid. For information on mass tagging within the Document Viewer, see Manage Mass Actions in the Relationship Panel. |
See the following procedure to select multiple documents in the same way all at once.
-
Complete the steps described in Select Documents for Mass Action.
-
In the Actions drop-down menu, select Tag Documents.
-
In the resulting dialog box, make the following selections:
-
Tag group: select the applicable tag group .
-
Tags: select or clear individual tags. To leave tags that have already been applied unchanged, leave the option box as-is.
See the following figure for details:
-
-
Click
 .
. -
Repeat this procedure for other groups of documents that must be tagged in the same way.

Edit Multiple Fields
Users with appropriate permissions can replace field content across multiple records at one time:
Use the following procedure to edit documents located in the Results grid. See Work with Search Results.
-
Complete the steps described in Select Documents for Mass Action.
-
Click
in the mass action toolbar to display the menu. - Select Edit Fields.
-
In the Edit Fields Options list, select one of the following actions:
-
Search and Replace: Find specific content in a selected field(s) and replace it with different content.
-
In the list of Available Fields, double-click each field to be changed in the same way. Alternatively, use Shift+click or Ctrl+click to select a contiguous or non-contiguous set of fields, respectively, then click > to move these fields into the Selected Fields list.
-
Enter the content to be replaced in the Search for field. This entry is not case sensitive.

Tip: An entry is required in the Searchfor field. If you want to replace empty fields with content, use the Overwrite Field option
- Enter the new content in the Replace with field. The format of your entry must match the field type (for example, if a Date field must be changed from 01/01/2014 to another date, use the same format for your replacement entry). For text entries, the capitalization used here will be used in the selected field(s).
-
-
Copy Field: Copy the content of one field to another field.
-
In the Copy From field, select the field containing the content you want to copy.
-
In the Copy To field, select the field in which the same content should be used.
-
-
Overwrite Field: Replace whatever content exists in a selected field(s) with different content.
-
In the list of Available Fields, double-click each field to be changed in the same way. Alternatively, use Shift+click or Ctrl+click to select a contiguous or non-contiguous set of fields, respectively, then click > to move these fields into the Selected Fields list.
-
Enter the new content in the Overwrite Selected Field with this Text box. The format of your entry must match the field type (for example, if a Date field needs to be changed from 01/01/2014 to another date, use the same format for your replacement entry). For text entries, the capitalization used here will be used in the selected field(s).
-
-
-
Click
 .
. -
To perform another mass action on the same selected documents, click
in the mass action toolbar to display the menu.
Example: All or part of a field’s content can be entered. For example, a Custodian's name might be entered as both “Jon Smith” and “John Smith” in your case. For consistency, you could search for “Jon” and replace it with “John” so that the company name is consistent. See the following:

Download Data for Multiple Records
By default, up to 1 GB of data can be downloaded from an OPEN DISCOVERY case. Your administrator may configure a different limit.
|
|
Note: You must have permissions to access Mass Actions and Launch Native to complete these procedures. |
To download data, use the following procedure to download data located in the Results grid. See Work with Search Results.
-
Optional: Sort the documents. Documents will export in the order shown. See Work with the Results Grid Columns for details about sorting, filtering, and so on.
-
Select the documents to be downloaded.. You can select one, some, or all of the documents located in the grid by selecting the check box for each document. At least one document must be selected.
To select all documents in the grid, complete the steps described in Work with Mass Actions.
-
Click
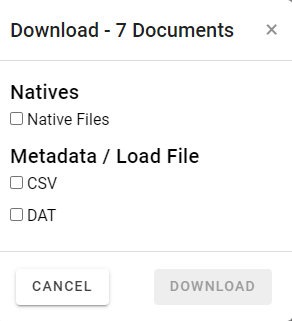
 to open the mass actions menu and select Download. The Download dialog box appears.
-
Select the records to be exported:
-
Natives: Native documents can be downloaded without creating an export. Contents will be provided in a zip file and placed within a Natives folder. Documents will be identified by the BEG DOC number.
-
Metadata/Load File: Metadata can be downloaded to a .CSV or .DAT file. Contents will be provided in a zip file and placed within a Data folder.
-
.CSV file:. Documents will be identified by the BEG DOC number and include the fields currently in the grid view.
-
.DAT file: Documents will be identified by the BEG DOC number. Fields and Tags available in the user grid will be provided in the load file if load file is selected. A new field will be added to the end containing native location to be used to update.
-
-
-
Click
 .
The selected output file type is generated and placed in your Downloads folder.
.
The selected output file type is generated and placed in your Downloads folder. 
Note: : The file size is monitored by OPEN DISCOVERY. If it reaches the size limit (1 GB or as configured by your administrator), a message then alerts you and the process is canceled. To address this issue, reduce the size (select fewer records and/or fewer columns of data), or contact your OPEN DISCOVERY administrator for assistance
Assign Documents to a Review Pass
Documents may be assigned to an existing review pass. When the documents are assigned to the review pass, they are automatically batched for that review pass. This eliminates having to access the Review Pass screen, refresh, and create batches manually. The ability to assign documents to a review pass by using a mass action is controlled by the review pass administration.
Perform the following procedure to assign one or more documents located in the Results grid to a review pass. See Work with Search Results.
-
All documents: To assign a review pass to all documents in the current document set, complete the steps described in Select Documents for Mass Action.
-
Selected documents: To assign a review pass to selected documents, select the check boxes associated with any documents you would like to assign to the review pass, as shown in the following figure.
-
Click
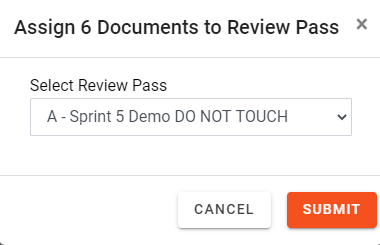
in the mass action toolbar to display the menu. - Select Assign To. The Assign X Documents to Review Pass dialog box appears.
- On the Select Review Pass drop-down menu, select a Review Pass.
- Click . A prompt displays to indicate the documents were added to the selected review pass.
|
|
Note: Only review passes with created batches display for selection. TAR related review passes will not be available for selection. |
Perform Mass Action Print to PDF
Perform the following procedure to print one or more documents on the Results grid. See Work with Search Results.
|
|
Note: Users must have permission to View Redactions in order to mass print from OPEN DISCOVERY. Since the printer can burn in redactions when printing, users by default must have rights to view redactions to complete printing operations. For more information on assigning user permissions, see Assign Permissions. |
-
All documents: To print all documents in the current document set, complete the steps described in Select Documents for Mass Action.
Note: Printing a PDF with more than one document selected produces a PDF for each document.
-
Selected documents: To print selected documents, select the check boxes associated with any documents you would like to print, as shown in the following figure.
-
Click
in the mass action toolbar to display the menu. - Select Print to PDF. The Print to PDF dialog box appears.
-
Complete the Print to PDF dialog box by selecting all required options. For instructions about how to do so, click
here.-
-
Original images only: to add image keys to the bottom-right corner of each page, select the Image Key option in the Quick Endorsements area.
-
Original images only: to include a text watermark, enter the required text in the Watermark field. This text will display “behind” existing document content, similar to a stamp.
Note: Redactions may obscure some or all of a watermark.
-
To print images from more than one image set (to minimize or eliminate the number of missing images), complete the following steps:
-
Add all image sets (original and production) from which images may be used to the Selected list. To do so, select the image set(s) in the Available list and click the right arrow.
-
Review the selected image sets; if any set is not required, click on the set in the Selected list, then click the left arrow to move it to the Available list.
-
Review the order of image sets. The order in the Selected list determines how OPEN DISCOVERY finds a document to be printed. For each image:
-
OPEN DISCOVERY looks first in the image set at the top of the list; if the image is found, it is then printed.
-
If the image is not found in the first set, OPEN DISCOVERY checks the second set; if the image is found, that is the version that is printed.
-
If the image is not found in the first or second sets, OPEN DISCOVERY continues to check remaining image sets in the Selected list, from top to bottom. As soon as it finds the image, that is the version that is printed.
-
-
To change the order of image sets in the Selected list, click the name of an image set to be moved, then click the up or down buttons until the image set is in the required position. Repeat to move other image sets until the list is in the required order.
-
-
If required, select the Include “Image Missing” slip sheet if image unavailable option.
-
To print only original images, ensure that <Original Images> is in the Selected list. If original images are missing, they will be skipped in the print job.
-
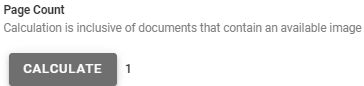
The Page Count of your document can be calculated by clicking CALCULATE.

See the below video on how to quickly calculate the page count of any document.
-
Original images only: reviewers’ annotations (embedded text, highlighting, and/or mark-ups) are printed by default if they exist. Perform either of the following actions to change annotation settings:
-
To remove all annotations in original images from the print job, clear the Print Annotations option.
-
To remove individual annotations in original images from the print job, click each annotation to be removed.
-
-
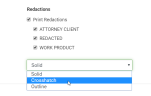
Original images only: all redactions will be printed in solid format by default if they exist. If you have the permission to modify/delete other users’ redactions, perform any of the following actions to change redaction settings:
-
To remove all redactions in original images from the print job, clear the Print Redactions option.
-
To remove individual redactions in original images from the print job, click each redaction to be removed.
-
To change redaction format, select the required format from the list below the redactions list. In this figure, the Crosshatch format is being selected.
-
-
Define other aspects of the print job on the Slip Sheets tab and/or Endorsements tab through the procedures described in this section. Or, click Save if the print job is ready.
-
-
A slip sheet is a separator page between documents. If printing a single document, a slip sheet allows you to include a cover sheet with document-specific detail. To include slip sheets in your print job:
-
Select the Include Slip Sheets option.
-
For a plain slip sheet, click the Blank Page option and skip to step 4.
-
To include document-specific information in the slip sheet:
-
Click the Fields/Custom option and complete any of the following steps.
-
To include a custom message, enter it in the Custom Text field.
-
To include field content, in the Available Fields list, select the fields to be included in the slip sheets.
-
To include tags from selected tag groups, in the Available Tag Groups list, select the groups to be included in the slip sheets.
-
-
Define other aspects of the print job on the Options tab and/or Endorsements tab through the procedures described in this section. Or, click Save if the print job is ready.
-
-
Endorsements are document details printed in the header and/or footer of documents in the original image set.
Note: Endorsements are for original images only; they will not be added to production-set images.
To include endorsements in your print job:
-
Click the Endorsements tab and perform the following steps.
-
To include field content in each document’s header and/or footer:
-
Click the Data Fields tab.
-
Select one or more fields to be included in a specific area in the header or footer.
-
At the bottom of the fields list, select the location where the field(s) should be printed, as shown in this example.

-
Click Map Endorsements.
-
Repeat these steps to include other fields in other locations.
-
-
To include tag details in the header or footer, click the Tag Options tab, then repeat step 2, selecting tags instead of fields.
-
To include a custom message in the header or footer:
-
Click the Custom Text tab.
-
Click in the custom text area and type the information (a single line) to be included.
-
At the bottom of the custom text area, select the location where the custom text should be printed, as explained in step 2.
-
Repeat these steps to add custom text to other locations.
-
-
Review your endorsements. If changes are required:
-
For an area that contains endorsements on multiple lines, change the order of the lines by clicking an item and clicking the corresponding
 or
or  button to move the line up or down, respectively.
 -
To remove a single endorsement from a particular area, double-click on the endorsement in question.
- To remove all endorsements from a particular area, click Clear for that area.
-
To remove all endorsements for all areas, click Clear All.
-
-
Define other aspects of the print job on the Options tab and/or Slip Sheets tab through the procedures described in this section. Or, click Save if the print job is ready.
-
-
- After all print options have been defined, click Save. A prompt displays that indicates the documents were added to the Job Manager to be processed. For more information about the Job Manager, see Overview: Job Manager.


Perform Mass Action Imaging
Perform the following procedure to image one or more documents on the Results grid. See Work with Search Results.
-
All documents: To image all documents in the current document set, complete the steps described in Select Documents for Mass Action.
-
Selected documents: To image selected documents, select the check boxes associated with any documents you would like to image, as shown in the following figure.
-
Click
 in the mass action toolbar to display the menu.
 - Select Image.
-
A dialog box appears. Select required options.
Option
Description
Color Options
Select the method by which colors will be processed.
Note: Color rendering is explained on many public websites. Refer to those resources if you want details on color settings.
Use eCap project default
Use the color settings of the selected eCapture project.
Black and white (1 bit)
Renders as Group 4 TIFF
Grey scale (8 bit)
Renders as LZW TIFF
Color (8 bit)
Renders as LZW TIFF
True color (24 bit)
Renders a JPG
eCapture Project
Select the eCapture project to be used for the OPEN DISCOVERY imaging job. Files will be processed using all eCapture project settings (except color settings if you selected color options for this job).
Original File Name
Select the fields containing the Original File Name and Location, to be included in placeholder files for documents with no associated native files.
Original File Location
- After all options have been defined, click Submit. A prompt displays that indicates the documents were added to the Job Manager to be processed. For more information about the Job Manager, see Overview: Job Manager.
Perform Mass Action OCR
Perform the following procedure to OCR one or more documents on the Results grid. See Work with Search Results.
-
All documents: To OCR all documents in the current document set, Complete the steps described in Select Documents for Mass Action.
-
Selected documents: To OCR selected documents, select the check boxes associated with any documents you would like to OCR, as shown in the following figure.
-
Click
in the mass action toolbar to display the menu. - Select OCR.
- A confirmation message appears. To proceed with the OCR job, click OK. A message displays in the bottom-right corner of the screen, indicating the documents were added to the Job Manager to be OCRed. For more information about the Job Manager, see Overview: Job Manager.
Create a QC Batch
Perform the following procedure to create a QC Batch on the Results grid. See Work with Search Results.
-
All documents: To create a QC Batch from all documents in the current document set, complete the steps described in Select Documents for Mass Action.
-
Selected documents: To create a QC Batch from selected documents, select the check boxes associated with any documents you would like to include, as shown in the following figure.
-
Click
in the mass action toolbar to display the menu. -
Select Create QC Batch. A dialog box displays requesting you to select a review pass.
Active Learning Enabled Review Pass QC Batches
QC Batches can be created as a part of an Active Learning enabled review pass. Only records that are part of the original review pass can be added to a QC batch. They can be used for almost any purpose, but most often are used for:
-
Reviewing Conflicts
-
Coding Quality Review
-
Relevancy Score QC
-
Late stage elusion testing
Coding decisions made outside of the Active Learning enabled review pass will not modify the Positive or Negative status of the example, so it is important to use the QC Batch option if the coding change is intended to apply to the Active Learning project.
Using Mass Action, one QC Batch is created for all records submitted with the mass action process. The default batch size selected for the review pass does not apply.
Creating an Active Learning Enabled Review Pass QC Batch
-
Filter down to the records in your grid view.
-
Using the Mass Action option, select Create QC Batch.
-
Select your Active Learning enabled review pass from the selector.
Related Topics