Add a User
Before You Begin
For efficient creation and management of users:
-
Decide on the approach to use for user name, user ID, and password details.
-
Name: For example, decide on the order of first and last names (
John SmithorSmith, John). -
User ID: Determine what you will use for user IDs. For example, if your organization has employee IDs, it may be most logical to use those IDs. A maximum of 60 characters can be used.
-
Password: Determine a password approach that will provide appropriate log-in security for your organization. See Determine password requirements.
-
No other character limitations or particular formats exist for user information.
Add a User
To create users one by one in Eclipse SE Administration:
-
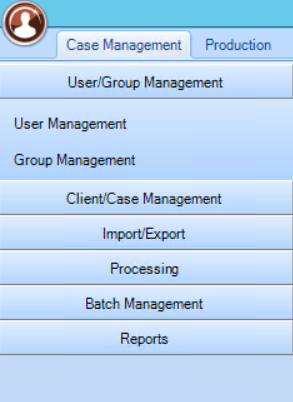
Launch Eclipse SE Administration, and make sure that the Case Management tab is selected at the top-left corner of the screen. Then click on User/Group Management in the left navigational panel.

- Click User Management.
- In the User Management work area, select the
 icon to add a new user.
 -
The Add User dialog appears. Enter the new user’s full name (60 characters maximum), user ID, and a password, per your planning decisions. Notes:
-
User IDs must be unique.
-
Passwords must be from 6 - 16 characters long.
-
-
If the added user should not be active at this time, select the Mark as Inactive option. When finished, click OK.
-
The user is created and shows up in the User Grid. Assign the user privileges by selecting the
 icon beside the Default User Privileges pane in the work area. The Modify Privileges dialog appears.
 -
You can add or remove privileges for the user by selecting the check box next to each privilege. See Control System Access Using Groups, Users, Roles, and Privileges for more information on roles and privileges.
When finished, click OK.
-
Click the
icon next to the Case Assignments and/or Group Assignments pane to assign the new user to cases and groups. In the resulting dialogs that appear, select the case(s) and/or group(s) that the new user should be assigned to, then click OK. See Overview: Cases and Overview: Groups for more background information about creating and modifying cases and groups. -
Repeat these steps for all users being added at this time.
-
Inform the user of their Eclipse SE login names and passwords.
Related Topics
Control System Access Using Groups, Users, Roles, and Privileges
Last Revision: 6/2/2023
Version: 2019.0.0