Overview: Case Records
As part of the following case activities, you have the ability to view case record details and make certain record changes/edits in Eclipse SE Administration:
- After importing case data
- After migrating a case from Concordance
- As part of case management
Regardless of the specific activity, the record evaluation and tasks are the same, as explained in this section.
Review and Edit Case Records
Get Started Reviewing Case Records
To evaluate records as part of your Administration activities, complete the following procedure:
-
In Eclipse SE Administration, complete one of the following procedures:
-
Import case data as explained in Overview: Import/Export .
-
Migrate a case as explained in Migrate Cases from LexisNexis Concordance.
-
Edit a case as explained in Overview: Edit Cases.
-
If you are importing case data, open Eclipse SE Administration.
-
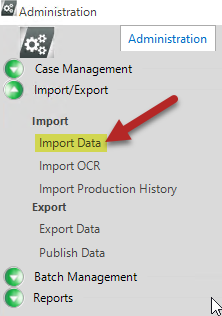
Click the Import/Export arrow in the left navigation panel.
-
In the expanded menu, click on Import Data.
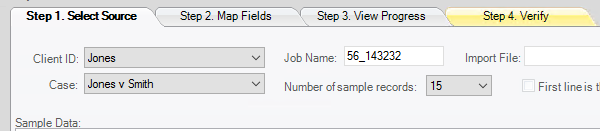
- Select the Client ID and Case.
-
Click the Step 4. Verify tab.
-
If you are migrating a case, complete the following after you have migrated the case:
-
Open Eclipse SE Administration
- In Eclipse SE Administration, cIick the Case Management arrow.
-
Click the Migrate from Concordance option.
- Select the Case and Client.
- Click the Step 4. Verify tab.
-
If you are editing an existing case:
-
Open Eclipse SE Administration.
- CIick the Case Management arrow.
-
Click the Case Management option.
- Select the Case and Client.
-
Click the Database Records tab.

-
Click List All Records. Or, list selected records based on a search by clicking Build Search. For details on searching, see Overview: Search.
After completing the steps above, complete any of the following actions in the Documents list (shown in the figure below):

-
Check the total number of documents at the top of the pane (in parentheses).
-
The listing is a tree view with documents at the top level. Click to see pages associated with particular documents.
-
Click a document or page to see associated details to the right of the Documents list.
-
To go to a specific image key or document ID:
-
Right-click in the list, select the appropriate Go to command.
-
Select or enter the desired image or document identification (ID) in the dialog box that appears.
-
Click OK. The document or document containing a selected page will be moved into the visible record list and highlighted. If the exact ID does not exist, the closest ID will be highlighted.
-
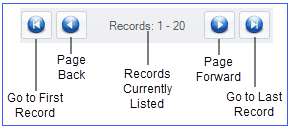
Navigate in the Documents list using the buttons at the bottom of the pane (shown below).
After completing the steps above, select a specific page of interest in the Documents list. Details for a selected page are presented in the center and right side of the workspace. Note:
-
If details in a field(s) in the center part of the workspace extend beyond the size of the field, click in the field and use the right arrow key to see the “hidden” content.
-
If content in the Field-Data list extends beyond the size of the field, change column widths (to some extent) by dragging column separators.
-
If needed, in the Field-Data list, click, then right-click a row and select Copy Record or Copy Field. The data can be pasted into any file for evaluation.
-
Click  next to the Image File and/or Page OCR field to view the image file and/or extracted text associated with a particular page. Click Fit Width or Fit Height in the image viewer as needed to evaluate a file.
Regarding content in this area of the tab:
-
Doc Id and Image Key are the given details for the selected record.
-
Document-Level and Page-Level content is information about the selected document or page that has either been imported or has been added by a reviewer in Eclipse SE Desktop. For example:
-
Doc Tags are the tags that have been applied to a document.

-
Annotations lists the types of annotations added to a document (or page).

-
Redactions lists the redactions added to a document (or page).

-
Word Hits: For cases based on .LFP, .DLF, or EDRM (XML) import files, if the import file included word coordinates (which allow search hits to be highlighted on the Image tab), that information will be imported and listed in this field.

Not all fields in this area will contain information. For example, if your case has no field defined as NATIVE, the Native File field will be blank.
After completing the steps above, select a specific page of interest in the Documents list and check the image file path as explained in the following steps:
-
Click next to the Image Path field.
-
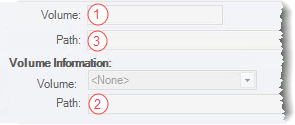
Check the volume and path information in the center portion of the tab as shown in the following figure. If the image is not found, go to step 3.

-
If needed, verify or document the complete path being used for the image file by right-clicking in the Image File field and selecting Copy Path, then pasting the path in a text or other file. The complete path and filename are included.
-
Image path problems may occur in the following areas:
-
Make corrections as listed in the following table:
Correcting Image Path Problems
|
1
|
Selected volume is wrong
|
For a single document, select the correct volume from the Volume list.

|
TIP: To see the change, you may need to click a different record, then click the record for which you made the change.
|
To change the volume for several documents, or if the correct volume does not exist, see Manage Volumes.
|
|
2
|
Volume path is wrong
|
For a single volume, correct the volume’s path as follows:
-
Define the correct path:
-
Click  . .
-
Navigate to and select the correct folder.
-
Click OK.
-
Click Set VolumePath.
If several volume problems exist, correct them as explained in Manage Volumes.
|
|
3
|
Defined path is wrong
|
To correct the path within the volume location, see Manage Volumes.
|
|

|
CAUTION! Documents or pages may be deleted without a confirmation message. Be certain of your actions before proceeding.
|
To delete pages or documents:
-
Access the Database Records tab in Administration and list all documents.
-
Review the Documents list and identify the document(s) or page(s) to be deleted. You can delete:
-
A document and all of its pages
-
A page or range of pages within a document
-
A range of documents
-
A set of documents based on a search (documents in the search results)
-
Read the following notes, then continue with the steps in the following table, depending on what is to be deleted.
|

|
NOTES:
-
The time required to complete the deletion process depends on the amount of data being deleted. If Administration appears to be idle, simply wait for the process to complete.
-
When you delete pages in a document (not the document itself), the associated records are deleted, as well as the “pointers” to page images. Thus, the Image tab for the pages will state “Image could not be found.” Extracted Text, etc. tabs will still contain the page content.
-
When documents or pages are deleted, any associated work product (redactions, sticky notes, etc.) is also deleted.
-
Deleting documents or pages does not delete the actual image files (or any other files).
-
Deleting documents or pages from your case requires it to be re-indexed for searching purposes. Ensure that you re-index the case as soon as possible after these procedures. (Some of the following options allow you to re-index as part of the process.)
|
Document/Page Delete Methods
|
A document and its pages
|
Click, then right-click the document and select Delete document. The document and its pages are deleted immediately.
|
|
A specific document page
|
Click, then right-click the page and select Delete page. The page is deleted immediately.
|
|
A range of documents
|
To delete a consecutive set of documents (including all pages):
-
Click, then right-click the first document to be deleted and select Delete document range.
You can modify the Starting Doc entry or select a different image key if needed.
-
Enter the Ending Doc image key to be deleted, or click Select and choose needed image key.
-
Select Delete Documents and Pages.
-
To re-index the case later, select Skip Full Text Index Updating. Otherwise, the case will be re-indexed as the documents are deleted.
|
|
NOTE: Re-indexing now may cause processing delays, depending on the size of documents, number of documents, and your system resources. If you do not skip indexing, you can click Cancel to stop the process if needed. Documents deleted to that point will be removed from your case.
|
-
Click Start.
-
In response to the confirmation message, click OK.
-
When finished, click Cancel.
-
If you selected the “Skip Index” option in step 4, after the process completes, a message will ask you if you want to rebuild the index. Click Yes to re-index the case, or No to wait until another time.
|
|
A range of pages
|
To delete all pages within a range of documents (not the documents themselves):
-
Click, then right-click the first document containing pages to be deleted, then select Delete document range.
You can modify the Starting Doc entry or select a different image key if needed.
-
Enter the Ending Doc image key to be deleted, or click Select and choose the needed image key.
-
Select Delete Pages Only.
-
Click Start.
-
In response to the confirmation message, click OK.
-
When finished, click Cancel.
|
|
Documents or pages based on a search
|
To delete all documents or pages in a search-results set:
-
Click Build Search and define/run the needed search.
-
Review the search results and ensure these are the documents or document pages to be deleted.
-
Right-click a document in the list and select Delete Document(s) in Search.
-
Select the needed option:
-
Delete Pages/Images only: Pages only will be deleted (not the documents themselves).
-
Delete Documents and Pages/Images: Documents, including all pages, will be deleted.
-
If you chose the “Delete Documents” option in step 4, select the Skip Full Text Index Updating option if you want to bypass indexing at this time.
-
Click Start.
-
In response to the confirmation message, click OK.
-
When finished, click Cancel.
-
If you selected the “Skip Index” option in step 5, after the process completes, a message will ask you if you want to rebuild the index. Click Yes to re-index the case now, or No to wait until another time.
|
Related Topics
Overview: Case Folders and Files
Add, Edit, or Delete Case Instructions, Alerts, and Non-Discovery Documents
 Review the Documents List