Create a Standard Data Extract Job

Data Extract Jobs are based on completed Discovery Jobs. If the Discovery Job was not indexed, searching is not available in the Flex Processor Rules Manager.

The Data Extract Job creates output that contains a paginated text file, an extracted text file, and the original file. It does not output Image Files. The output is stored in the directory that was selected when the Client was created. The following is an example path: \\eCaptureData\ProjectOne\DataExtract Jobs\DE000009\Output\1000\220. The 220 directory contains the output files mentioned at the beginning of this paragraph.

To create a Standard Data Extract Job, perform the following steps:

  1. Right-click Data Extract Jobs underneath the proper Custodian.

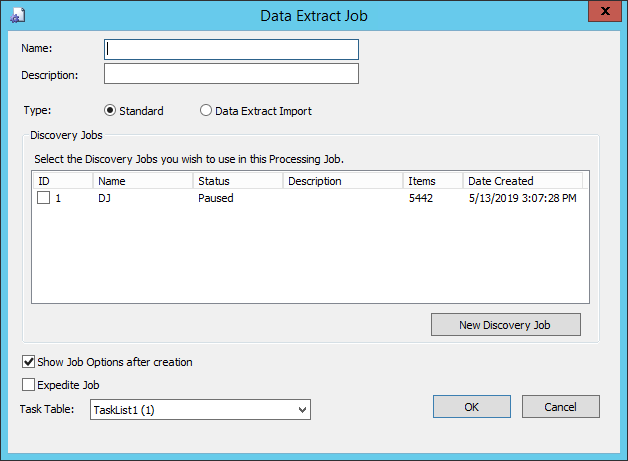
  2. Select New Data Extract Job. The Data Extract Job dialog box appears.

  3. Enter a Name.

  4. Enter a Description.

  5. Choose Standard.

  6. Select one or more of the Discovery Jobs you want to use for this Data Extract Job.

  7. (Optional) If you want to create a new Discovery Job at this time, click New Discovery Job. After creating the Discovery Job and selecting the Discovery Job options, the newly created Discovery Job will display in the Discovery Jobs list (in the Data Extract Job dialog box) and will be selected. The Discovery Job also displays in the Job Queue grid of the eCapture Controller.

  8. (Optional) If you do not want the Data Extraction Job Options to display, clear the Show Job Options after creation check box.

  9. (Optional) If you want the job pushed to the front of the queue, select the Expedite Job check box.

  10. Select a task table from the drop-down menu. The task table that displays in the field is based on the last task table selected for the Custodian.

  11. Click OK. One of the following happens:

    • The Data Extract Job displays in the Job Queue grid of the eCapture Controller.

    • The Data Extract Job Options dialog box appears.

  12. To set the Data Extract Job options, click the following section to learn more about options for Data Extract Jobs:

    ClosedData Extract Options

    The following steps describe how to set the options available for creating a Data Extract Job.

    Set the General Options

    Retry errors with Outside In (Stellent) - Used to image Microsoft Office (Excel, Word, and/or PowerPoint) documents. The Outside In (Stellent) option:

    • Allows for faster and more consistent generation of images on the first pass
    • Reduces the amount of time spent manually QCing these document types

    When this check box is selected, only Outside In (Stellent) is used to process images; the Microsoft related options are grayed out by default. Full metadata is extracted and time zone imaged output reflects the time zone handling options configured for the Data Extract Job. All files processed by Outside In (Stellent) receive the Stellent Processed flag in QC.

    The processing output differs when using Outside In (Stellent) to view and image documents. However, the QC applied flags, metadata, and optional summary reports will be similar if processing is done without Outside In (Stellent). Other processing options, including Flex Processor processing options, are respected when using Outside In (Stellent).

    Replace tabs with spaces when extracting Excel text - When this check box is selected, the extracted Excel text will look similar to the following:

    Column A Column B

    Value1 Value2

    The column data is separated by a space rather than a tab (which can be, for example, the equivalent of five spaces). Therefore, if the check box is cleared, then the column data of the extracted Excel text is separated by a tab (five spaces) and would look similar to the following:

    Column A     Column B

    Value1     Value2

    Expand Pivot Tables when extracting Excel text - By default, this check box is cleared. If pivot tables exist, then they will be expanded when this check box is selected. A flag is also set in QC to indicate that the Pivot table exists in the worksheet.

    Set the OCR Options for a Specific Data Extract Job

    Note: If you are setting Case (Project) Level options, OCR and Time Zone Handling options are defined on the Common Options tab because Discovery Jobs and Data Extract Jobs use the same OCR and Time Zone Handling options. For more information about setting options at the Case (Project) level, see Create a New Case (Project).


    The OCR Settings available for Data Extract Jobs are outlined in the following table.

    Option

    Description

    OCR images as necessary

    Select this check box to OCR images. Images will be OCRed for indexing/language identification if necessary. The OCR text obtained from the image is then passed on to dtSearch for indexing. The OCR will be indexed and available to be searched on in the Flex Processor.

    OCR PDF documents

    PDFs with no embedded text: perform OCR before indexing or language identification. PDF pages with embedded text (text-behind) will have text extracted. Comments on a PDF file are also extracted.

    1. The OCR text is added to any extracted text from the PDF.

    2. The text obtained through OCR, along with the extracted text from the PDF, is passed to dtSearch for indexing.

    3. The OCR is then indexed and available to be searched in the Flex Processor.

    OCR PowerPoint Documents

    Select this check box to perform OCR on Microsoft PowerPoint files during Data Extract to get text from embedded content in the slides. This results in slower speeds for PowerPoint files, but more accurate text extraction.

    PDF page character threshold

    Select a PDF page character threshold and indicate a value. The default value is 25 characters. If the value is less than 25, eCapture sends the page to be OCRed. If necessary, enter a different value.

    Minimum average OCR confidence [1-100]

    The level range settings are from 1 to 100. The default is 50. The OCR Confidence Level is the average percentage of confidence for each document, for all pages within a document on which OCR was performed. Success or failure of a document for flagging is based on the average confidence level of the document. If the average confidence level is below the selected threshold, the document is flagged in QC with the OCR Low Confidence Flag.

    Note: For calculating average document confidence, pages in PDF docs with text behind them are considered 100%. OCR failures are considered 0%.

    OCR Languages

    eCapture includes multi-language OCR capability. The QC document will contain the original OCR languages that were selected for the Data Extract Job. A valid multi-language OCR license must be available in order to modify the original selected languages, if necessary.

    To reserve a portion of the multi-language OCR licenses for QC and to keep the Worker from consuming all available licenses, use the Multi-Language OCR License slider located in the Controller System Options dialog box.

    Click OCR Languages to display the Language OCR dialog box.

    After selecting the languages, click OK to close the dialog box. The selected languages display in the OCR Languages field. Place the mouse pointer on the OCR Languages field to display a tool tip that lists all the selected languages that were not visible in the OCR Languages field. The OCR Languages field is a read-only field.

    Click Closedhere to view a list of supported languages.

    • English

    • Arabic

    • Chinese Simplified

    • Chinese Traditional

    • Japanese

    • Korean

    • Afrikaans

    • Albanian

    • Basque

    • Belarusian

    • Bulgarian

    • Catalan

    • Croatian

    • Czech

    • Danish

    • Dutch

    • Estonian

    • Faorese

    • Finnish

    • French

    • Galician

    • German

    • Greek

    • Hungarian

    • Icelandic

    • Indonesian

    • Italian

    • Latvian

    • Lithuanian

    • Macedonian


    • Norwegian

    • Polish

    • Portuguese

    • Portuguese Brazil

    • Romanian

    • Russian

    • Serbian

    • Serbian Cyrillic

    • Slovak

    • Slovenian

    • Spanish

    • Swedish

    • Turkish

    • Ukrainian

    Click here to view some Closedcaveats to OCR Language handling.

    English is the only language that is selected by default. The more languages that are selected, the lower the confidence level will be for correctly identifying the languages in a document.

    • If English is selected, Arabic will not be available for selection.

    • If Arabic is selected, all other languages will not be available for selection.

    • If one of the CJK (Chinese, Japanese, Korean) languages are selected, then all remaining CJK languages will not be available for selection. Other languages (excluding Arabic) may be selected.

    • If Chinese Simplified is selected, Chinese Traditional, Japanese, and Korean will not be available for selection.

    • If Chinese Traditional is selected, Chinese Simplified, Japanese, and Korean will not be available for selection.

    • If Japanese is selected, Chinese Simplified, Chinese Traditional, and Korean will not be available for selection.

    • If Korean is selected, Chinese Simplified, Chinese Traditional, and Japanese will not be available for selection.

    Set the Appropriate Option for Lotus Notes

    • High Speed (Optimized for speed)
    • Medium Speed (Balance of speed and quality)
    • Low Speed (Optimized for highest quality output)

    Set the Appropriate Option for Time Zone Handling

    • Convert all times to UTC
    • Specify Time Zone

    For more information about Time Zone Handling, see How eCapture Handles Dates and Time Zones.

    Note: If you are setting Case (Project) Level options, OCR and Time Zone Handling options are defined on the Common Options tab because Processing and Data Extract Jobs use the same OCR and Time Zone Handling options. For more information about setting options at the Case (Project) level, see Create a New Case (Project).

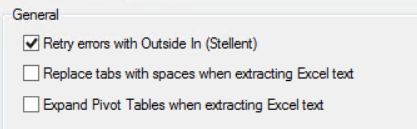
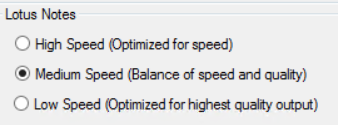
  13. Set the Filtering options for the Data Extract Job. You can create filters either on the Flex Processor Rules Manager dialog on using the Flex Processor Rules Wizard, for more information, see:

  14. When finished, click OK to exit the dialog box.


Related Topics

Create a Discovery Job

Create Task Tables

Assign Task Tables to Workers