Validate File Paths and System Fields
About Path and Field Management
Case Utilities allows you to validate image, native, and/or production image file paths defined in cases. It also allows you to check for the existence of the following system fields and update field contents:
-
Extracted text size (TEXT_SIZE )
-
Native file extension (FILE_EXT)1
-
Native file type (FILE_ID)
-
Hash values (MD5_HASH and SHA1_HASH)
-
Document image count (IMAGECNT)
-
Document’s ending page (ENDDOC)

Note: FILE_EXT was named “FILETYPE” in earlier releases.
If any of the fields you select for validation is missing (or no values exist), you will be alerted so that the field(s) can be added/updated.
For details on these fields, see About Database Fields.
Validate Paths and Fields
To validate files paths and/or check/update fields:
-
Getting started:
-
Identify needed information, including case and items to be checked/updated.
-
Select an appropriate time to make global changes.

Depending on the size of the database, system capabilities, and other factors, global functions may consume significant system resources and time. It is recommended that you carry out major global functions during “off hours” to minimize the impact to the system and your users.
-
If users might be logged on, alert them that performance may be affected while you perform this operation.
-
-
On the LOCAL DISCOVERY Dashboard, expand the Utilities menu in the top, far-left corner of the screen. Select the Validate Paths button from that menu to open the application in a new window.

-
Select the needed client ID and case.
-
Select the items to be validated and/or updated:
-
Check the log file location; if needed, enter or click Browse and navigate to/select a different path and/or file name.
-
Click Start. The Validate Image/Native Paths page begins the validation and/or update.
-
If any system fields are missing, the page prompts you to add them. In response to the warning message, click Yes.
-
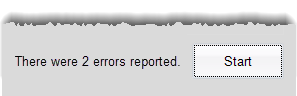
After the validation completes, note whether or not errors exist. This figure shows error details in the Validate Image/Native File Paths workspace.
-
If errors are indicated, open the log file (in Windows Explorer) and evaluate error details so that problems can be corrected.

|
|
NOTE: If your case includes documents lacking images (thus they have no pages) and you select Update EndDoc Field, you have the option to leave the ENDDOC field empty (by default it includes the BEGDOC value for such documents). Select or clear the secondary option as needed. |
Manage Volumes
About volumes
Image volumes
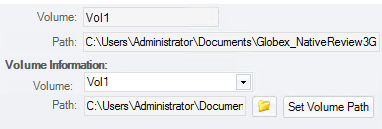
IPRO highly recommends the use of volumes, which are user-defined variables representing the paths where image files are located. Volumes provide an efficient way to define and manage case image files. The following figure shows the use of a volume as seen in the Administration Database Records tab. For details on the volume information, see :
Production volumes
Case Utilities creates volumes automatically for production jobs. This action makes it easy for you to change the location of production files, should this be necessary. (For example, if a server becomes full, you might need to copy production files to a new location).
Use the following procedures to manage volumes for both images and production files:
Create a new volume
To create a new volume to define the location of case images:
-
Getting started: Identify needed information, including full UNC path and volume name.
-
On the LOCAL DISCOVERY Dashboard, expand the Utilities menu in the top, far-left corner of the screen. Select the Manage Volume Paths button from that menu to open the application in a new window.
-
In the Manage Volume Paths workspace, select the needed client ID and case.
-
Click Create New Volume.
-
Enter a volume name and click OK. For example, VOL1.
-
Enter the path (using UNC syntax) and click OK. For example, \\SERVER001\CASES, not D:\CASES.
-
Repeat these steps to create additional volumes.
-
When finished, click OK.
|
|
NOTE: Make sure you enter the correct path; it is not validated during this process. |
Change path for existing volumes
To change the path of existing volumes (for either images or production files):
-
Getting started: Identify needed information, including needed path and volume name.
-
On the LOCAL DISCOVERY Dashboard, expand the Utilities menu in the top, far-left corner of the screen. Select the Manage Volume Paths button from that menu to open the application in a new window.
-
In the Manage Volume Paths workspace, select the needed client ID and case.
-
On the Manage Volumes tab, click
 corresponding to the volume to be changed.
 -
Enter the correct path and click OK. The path must be entered as follows:
-
For image volumes, enter a UNC path.
-
For production files, enter a local, mapped drive, or UNC path.
-
-
If needed, view images at the new location.
|
|
NOTE: Make sure you enter the correct path; it is not validated during this process. |
Delete a volume
If a volume is no longer used, it can be deleted as follows:
-
Getting started: Identify needed information, including needed path and volume name.
-
On the LOCAL DISCOVERY Dashboard, expand the Utilities menu in the top, far-left corner of the screen. Select the Manage Volume Paths button from that menu to open the application in a new window.
-
In the Manage Volume Paths workspace, select the needed client ID and case.
-
On the Manage Volumes tab, click
 corresponding to the volume to be deleted.
 -
Click Yes in response to the confirmation message.
|
|
IMPORTANT! Make sure the correct volume is selected and is not in use; no check is performed on this action. |
Update File Paths
The following procedure allows you to update path information as follows:
-
Modify image, native file, or production image path information for a range of pages (or the entire case).
-
Change the path used with a volume (the subfolder in the volume location).
-
Eliminate use of a volume and use a full path (not generally recommended).
-
Getting started:
-
Identify needed information, including image keys of documents to be changed and details of the path to be changed.
-
On the LOCAL DISCOVERY Dashboard, expand the Utilities menu in the top, far-left corner of the screen. Select the Manage Volume Paths button from that menu to open the application in a new window.
-
-
In the Manage Volume Paths workspace, select the needed client ID and case.
-
Click the Bulk Update File Paths tab.
-
Enter the Starting and Ending Image Key, or select Entire Case.
-
Select the type(s) of paths to be changed:
-
Image Path
-
Native File Path
-
Production Image Path
-
-
For changes that do not include the use of volumes:
-
Enter the path to be changed in the Search For field.
-
Enter the new path in the Replace With field.
-
Skip to step 8.
-
-
For volume-related changes:
-
-
Complete the Replace With field with the correct image path details, using the following syntax:
Complete the Search For field with the image path details to be replaced, using the following syntax:
@vol1@path1where:
vol1 is the volume name to be replaced, entered between two “at” signs. If no volume name exists, enter a single space between the at signs, as in:
@ @path1is the path to be replaced, as it appears in the Path field. If no path exists, enter nothing.@vol2@path2where:
vol2 is the volume to be used, entered between two “at” signs. The volume does not need to exist at this point, but must be created in order for images to be available in the case. Note: 1) If you need to change only the path (subfolder) details, enter the volume that is currently used for the images. 2) If you do not want to use a volume, enter a single space between the at signs, as in:
@ @path2is the path to be used (either a subfolder in the volume location or a full UNC path if no volume is used). If the volume defines the complete image path location, enter nothing for the path.See Search/replace examples for sample entries for replacing volume path details.
-
-
Click Start. For a large number of documents, a progress message will display at the bottom of the database records workspace.
-
Check documents in Review (in the Image, Quick View, and/or Production History tabs.
Search/replace examples
The following table shows examples of defined image paths and the search/replace entries needed to make changes using the procedure described in Manage Volumes.
|
Currently Defined |
Search/Replace Entries |
|
|
Replace a path that was part of the case import with a volume (VOL1) and subfolder (IMAGES):
Search For: Replace With: |
|
|
Change the existing volume (VOL1) to a different volume (VOL2), leaving the subfolder (IMAGES) unchanged:
Search For: Replace With:
Change the existing volume and subfolder:
Search For: Replace With:
Change subfolder alone:
Search For: Replace With:
Remove a volume and use a complete UNC path:
Search For: Replace With:
|


Related Topics
Version: 2023.8.12
Last Revision: 11/8/2023