|
|
Important: You are reviewing the Ipro for desktop 3.0 Help. To view the latest release of Ipro for desktop Help, click here. |

Save and Load Stages
As you work in PRESENT loading exhibits into zones and using tools as needed, your work area serves as a stage that shows jurors everything you do. Setting up this stage and saving it prior to your courtroom presentation can prevent mistakes and save time. Unlike Screen Snapshots, this feature saves the layout of the actual exhibits. Simply load a saved stage and begin playing video, page through a transcript, or do anything else you would normally do in your presentation.
You can save as many stages as needed and load the stage you need at the right time from a list in PRESENT. This feature also comes in handy when your presentation is interrupted. For example, if court breaks for lunch, use Save Stage so that you can quickly return to where you left off when court resumes.
Save and Load Stages
To save a stage using the toolbar button:
-
Load, position, and annotate your exhibits and/or other items in Presentation mode.
-
From the Application Tools, click the Save Stage button.


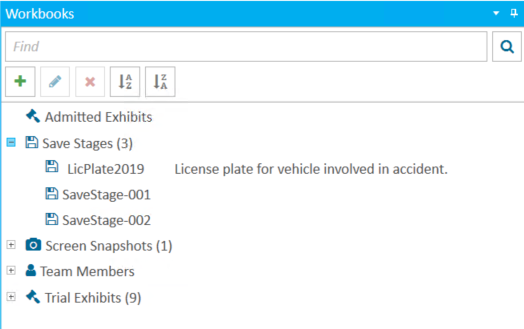
The stage is automatically saved to the Save Stage folder in the Workbooks Explorer.
To save and assign an ID to a stage using the command:
-
Load, position, and annotate your exhibits and/or other items in Presentation mode.
-
Type -SA followed by the ID, and press ENTER.
For example, -SA EXH0034
To load a saved stage:
-
Use the Navigation Tools to select the Save Stage folder.
-
Select the stage you want to load, and then click the green button.
|
|
Note: If you load a saved stage and display it on a screen with a different display aspect ratio (such as a projector in the courtroom), you may notice some visual differences. Although this has been minimized, we recommend you view it on the alternate display prior to a live presentation. |

Modify Save Stages
You are able to rename and add a description to a Save Stage. To modify the properties of a Save Stage, complete the following steps:
-
From the TrialDirector 360 main menu, select Evidence on the left navigation panel.

- Double-click on the case that contains the needed Save Stage.
- In the Workbooks Explorer, open the Save Stages folder.
-
Right-click on the Save Stage that you want to edit.
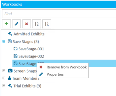
The Save Stage Properties window displays.

- In the Name field, modify the name of the Save Stage, as necessary.
- In the Description field, enter a description for the Save Stage.
-
When finished, click Save. The changes to the Save Stage are displayed in the Workbooks Explorer.


Related Topics
Version: 2019.3.0
Last Modified: December 2, 2019