Tagging and Commenting Documents
While previewing documents during an initial search, it is a good time to tag them for further classification, and add comments and notes that pertain to the . When working with hundreds or even thousands of documents in an archive, you must first cull the list down to a workable size and then tag the documents you deem pertinent to this or other . IPRO Search includes predefined tags for this purpose:
The manager can create custom tags, which can be useful if specific tags are required for the or organization. Custom tags are specific. That is, the tags you create only exist within that . If you decide that custom tags are necessary for , be sure to define them appropriately and communicate their proper usage to your team.
Once you have tagged a document, the next step is adding comments and notes. This can be extremely helpful when it is time to look a little closer at each and every document. If you spot a document that requires further investigation, you can include instructions on what to look for, such as date ranges, terms, or names, as well as pose questions for the reviewers who will be reviewing the documents.
Because the content of audit files is indexed, any comment you add to a document is always searchable. Comments cannot be removed after they are added to a document.
- In the Documents view, select a document.
- The Comments field and tags become accessible.
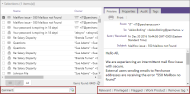
- To tag the document, click a tag button: .
- In the Comment field, type in your comments and press Enter or click the Add Comment button.

- To view your comment and tags, select the Tags tab.
-
In the Overview toolbar, click Save , unless Auto-Save is enabled—see Using Auto-Save.
NOTE
If you need to delete or search a new tag, make sure to wait until the system has fully committed them in the index and then it will be searchable. This may take a few minutes.


- In the Overview toolbar, click Edit .
- The Edit dialog box opens.
- Select the Tags tab.
- A list of tags that are currently being used is displayed.
- Click Add New Tag.
- A new tag appears at the bottom of the list.
- Place a check mark beside the new blank tag. Click inside the text box, give the tag a name and press Enter.
- A red triangle at the corner of the new tag indicates a custom tag.
- (Optional) To remove a tag, select a tag and click Remove selected Tag(s).
- Click Save.
-
IMPORTANT
Enabling Auto-Save does not enable automatic saving of case parameters when editing a case. - The new tag is added to the tags at the bottom-right of the Document view. If you removed any tags, they no longer appear in the interface.
You can only remove custom tags from the if the tag is not currently applied to any documents.
To remove a tag previously applied to a document, do the following:
- Select the document in the Documents View, navigate to the bottom-right corner of the Documents view, click Remove Tag and select the tag to remove.


To remove a tag previously created but not currently applied to any documents in the , do the following:
- Navigate to the Management toolbar, click Edit and select the Tags tab. Place a check mark beside the tag to remove and click Remove Selected Tab(s).
-
NOTE
The In Use column indicates whether the tag has been used or not (false = no, true = yes). - The tag is removed from the on which you are working.