Configuring Single Sign-On
IPRO supports Single Sign On (SSO). When SSO is configured, you can log in through your Identity Provider, there is no need to sign in separately to ARCHIVE or IPRO Search. Logins will occur automatically and invisibly.
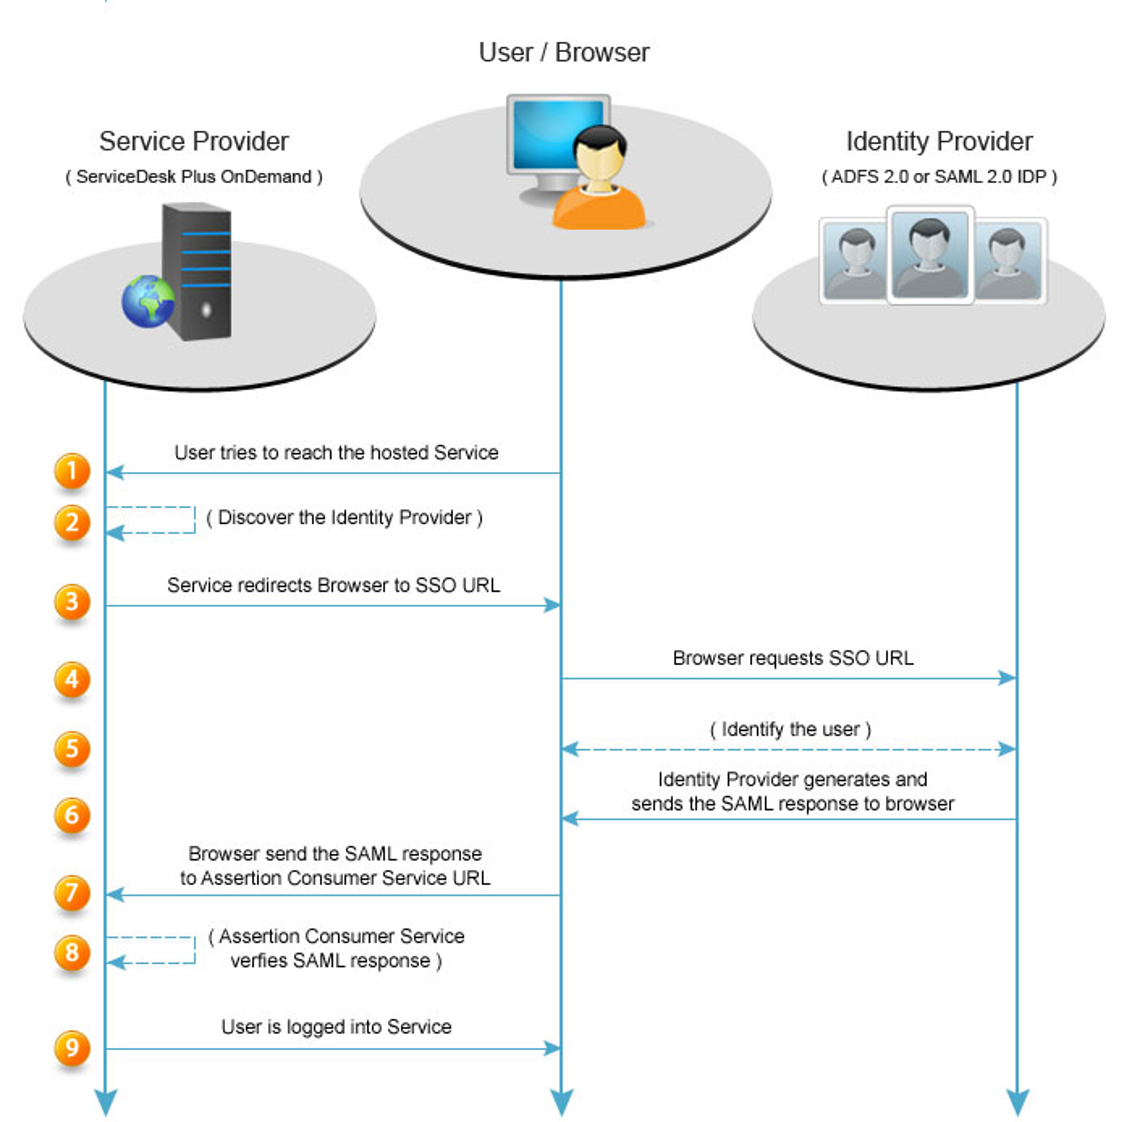
How SSO Works
ARCHIVE and IPRO Search both use Security Assertion Markup Language (SAML) to achieve Single Sign On. SAML is an open standard for exchanging authentication and authorization data between an Identity Provider and a Service Provider. Authentication is performed through Active Directory (AD) by recognizing a user's domain, which often corresponds to their email address.
For many organizations, Active Directory Federation Services (ADFS) acts as the Identity Provider.
ARCHIVE, IPRO Search, and Proxy access are each considered a separate Service Provider. Enabling SSO on Proxy access is optional but recommended.
IPRO Search does not use Multi-Factor Authentication (MFA). However, ADFS may use MFA, prompting your users to provide different types of personal information in order to authenticate.
What is called a Service Provider in SAML terminology is called a Relying Part in ADFS terminology.
Once SSO is configured, a typical workflow will proceed as follows:
- User logs in to ADFS.
- User attempts to access the login screen.
- Invisibly, ADFS is prompted for a SAML (or signed) assertion to authenticate the user and authorize login.
- IPRO APID verifies the signed assertion.
- The user is automatically logged in.
If the user attempt to sign in before they sign in to ADFS, they are redirected to the ADFS sign-in page, where they are prompted to enter credentials.
In all cases, once SSO is configured, the login screens for both ARCHIVE and IPRO Search are disabled and invisible.
If SSO is enabled, Admin users should not be synced.
Once SAML is enabled, users cannot change their password, since the welcome screen where this option appears is no longer visible. Since authentication occurs through Active Directory, the password is irrelevant when SSO is enabled.
Timeouts
IPRO Search has various timeouts designed to boost system security regarding user authentication. When SSO is enabled in IPRO Search and a timeout occurs, the session will refresh automatically after a timeout alert. ARCHIVE permanently auto-refreshes. In both cases, SSO overrides timeouts.
Assertion Validity
Assertions are permanent by default. The Administrator may choose to revoke assertions for specific users.
Certificates
You need a separate valid certificate for both the Identity Provider and for the Service Providers. You can have one certificate for all Service Providers (ARCHIVE, IPRO Search, and Proxy access) as long as they are on the same server. If the Service Providers are on different servers, each will need its own certificate.
The certificate cannot be self-signed unless you are using it as a test. AD FS will not accept a self-signed certificate.
If the certificate host name does not match the host name that users access, SSO might not work. During configuration, an auto-detect function will assist you in detecting anomalies.
Bypassing SSO for Admins
Admins can use the URL ending in /saml/ to bypass SSO when doing admin tasks.
In most cases, Admin synchronization is required for SSO bypass to work as expected.
Closing a browser will not log the user out of SSO in all cases.
For group users to bypass IPRO Search or the IPRO Admin UI, you need to set the Bypass Route.
- On the SSO tab, under SSO Type, select SAML.
- Under SSO Bypass Users, click Add Route.
- Set the Bypass Route

-
NOTE
You are not able to set the Bypass Route unless you have already set the Admin Route on the Admin Users tab.
Bypassing SSO for End Users (NOSSO)
After SSO is set up, any local, manually created end user can bypass SSO by using the IPRO Admin UI URL ending in /nosso/.
Example: https://10.201.2.230/nosso
The user must belong to a designated "nosso" group in AD in order to access this function.
The URL ending in /nosso/ will also work for admins.
Similar to SSO, an IPRO Search session in /nosso/ will refresh automatically after a timeout alert.
Closing a browser will not log the user out o fSSO in all cases.
Outlook Add-In
Since there is no connection between Outlook Add-in and ADFS, enabling Single Sign On (SSO) through SAML on Outlook Add-In is not possible. Instead, authentication is performed through IPRO Search. During Outlook Add-In setup, you have the option to authorize Outlook Add-In to use IPRO Search credentials. Upon first successful login to the Outlook Add-In, each user sees the following grant rights page:
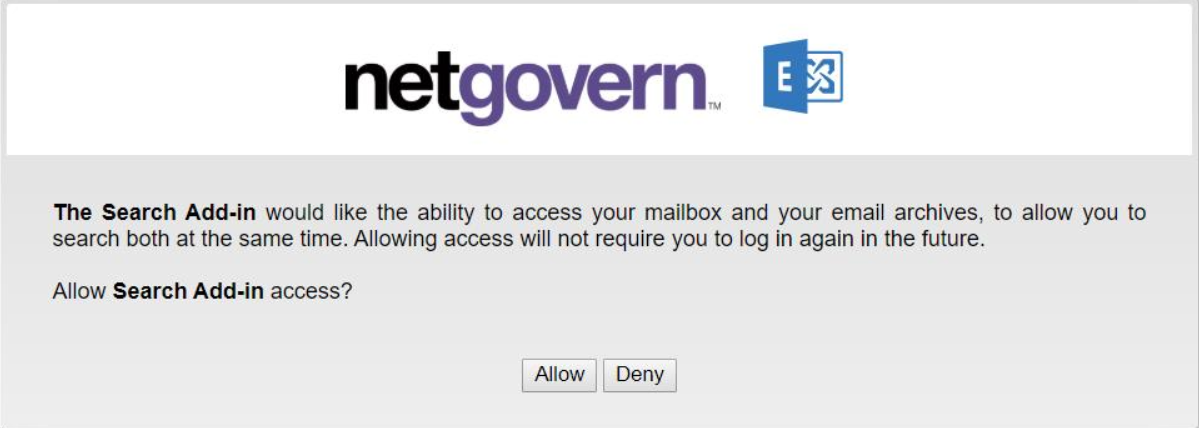
IPRO Search is displayed as 'NetGovern'.
If the user selects Allow, Outlook Add-In will have authorization to use IPRO Search credentials indefinitely, unless assertions are revoked.
Going forward, logins into Outlook Add-In will occur automatically, regardless of whether or not the user is logged into IPRO Search, and whether or not SAML is enabled in the IPRO Admin UI.
Maintaining Administrator Access
Once SAML is enabled, you no longer log into the IPRO Admin UI using Administrator credentials. Instead, you log in using credentials associated to your personal email address. Therefore, before you enable SAML, you must ensure that you assign Administrator access to yourself—see Configuring an Administrator.
If you do not do this, you will lock yourself out as an Administrator when SAML is enabled.
Configuring SSO
There are two ways to configure SSO: either by using ADFS, or another Identity Provider. Steps for both are provided further below.
When a computer is domain-joined, configuration is required if you would like to skip formed-based login. Use the following instructions to modify ADFS to enable Windows Integrated Authentication (WIA). When WIA is enabled, the user does not have to re-authenticate using ADFS.
Performed on the desktop:
- Internet Explorer (IE) and Google Chrome: On the desktop, add your company URL in the Intranet field in IE settings.
- Example: *.CompanyXyz.com
- Mozilla Firefox:
- Go to
about:config - Go to
network.automatic-ntlm-auth.trusted-uris property - Add the target FQDN (i.e.,
search.netgovern.com)
Performed on the ADFS server:
- Google Chrome and Mozilla Firefox: Use the following commands:
Set-ADFSProperties –ExtendedProtectionTokenCheck NoneSet-ADFSProperties -WIASupportedUserAgents @("MSIE 6.0", "MSIE 7.0", "MSIE 8.0", "MSIE 9.0", "MSIE 10.0", "Trident/7.0", "MSIPC", "Windows Rights Management Client", "Firefox/25.0", "Firefox/47.0", "Mozilla/4.0", "Mozilla/5.0")
The following steps must be taken in the IPRO Admin UI and ADFS must be in place.
In the event that you would like to perform a test setup before proceeding with actual configuration, you can select a built-in mock Identity Provider called Test. This can be used for test or demo environments. However, for security reasons, you should not use a mock Identity Provider for production environments.
- Log into the IPRO Admin UI. In Services, and open the SSO tab.
- Under SSO Type, select SAML.
- Enter the metadata URL for your Identity Provider on this page. Alternately, you can enter the host name of the ADFS system and the URL will populate automatically.
- Click Test, then click Save.
- Configure your Identity Provider to use IPRO services as the Service Provider. Enter the following metadata URLs:
- IPRO Administration:
https://<hostname>/sso/metadata.xml - IPRO Search:
https://<search box hostname>:8443/saml/metadata.xml

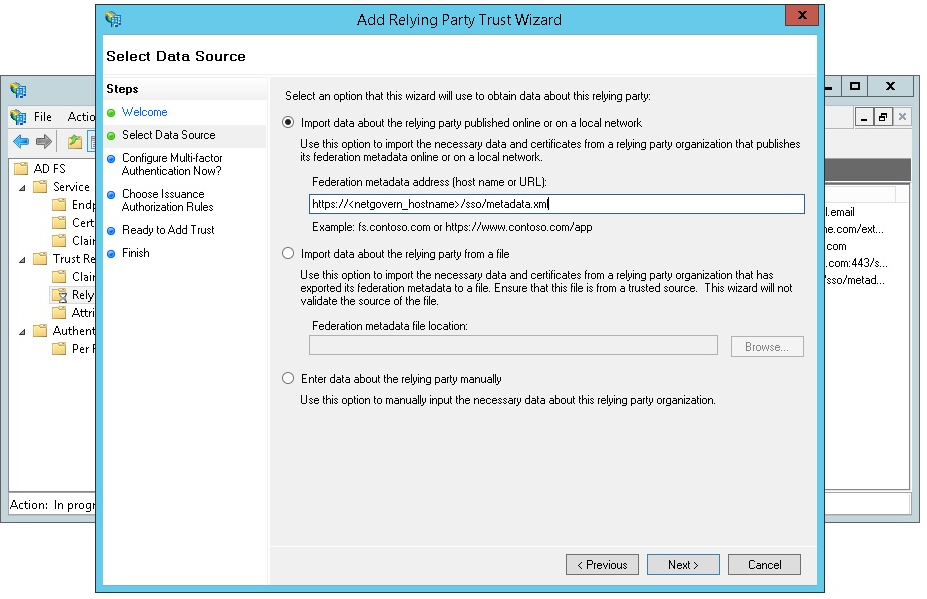
- Add a new Relying Party Trust in the ADFS control panel for IPRO Administration/Quarantine. Enter the following information:
- Federation metadata address:
https://<hostname>/sso/metadata.xml - Display Name: IPRO Admin/Quarantine


- Right-click on the Relying Party Trust you just created and select Edit Claim Rules.
- Add a new rule using Send LDAP Attributes as Claims as the Claim rule template.
- Set the Attribute Store to Active Directory.
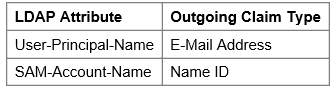
- Map LDAP Attribute to Outgoing Claim Type as follows:
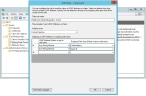
- Save your new claim rule.
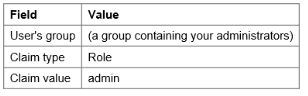
- Add another rule using Send Group Membership as a Claim as the claim rule template. Enter the following details:
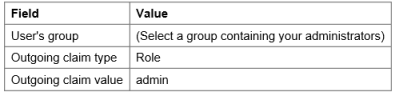
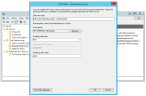
- Save your new claim rule.
- Add a new Relying Party Trust in the ADFS control panel for IPRO Search. Enter the following information.
- The default Federation metadata address:
https://<search hostname>:8443/saml/metadata.xml - Display Name: IPRO Search.
- Right-click the newly-created Relying Party Trust and select Edit Claim Rules.
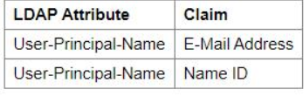
- Add a new rule using Send LDAP Attributes as Claims as the Claim rule template.
- Set the Attribute Store to Active Directory.
- Map LDAP Attribute to Outgoing Claim Type as follows:


You are now be able to log in to ARCHIVE and IPRO Search using SSO.
The following steps are available in the IPRO Admin UI and require you to have an Identity Provider in place.
In the event that you would like to perform a test setup before proceeding with actual configuration, you can select a built-in mock Identity Provider called Test. This can be used for test or demo environments. However, for security reasons, you should not use a mock Identity Provider for production environments.
- Log into the IPRO Admin UI. In Services, open the SSO tab.
- Under SSO Type, select SAML.
- Enter the metadata URL for your Identity Provider on this page.
- Click Test, then click Save.
-
- Configure your Identity Provider to use IPRO services as the Service Provider. Enter the following metadata URLs:
- IPRO Administration:
https://<hostname>/sso/metadata.xml - IPRO Search:
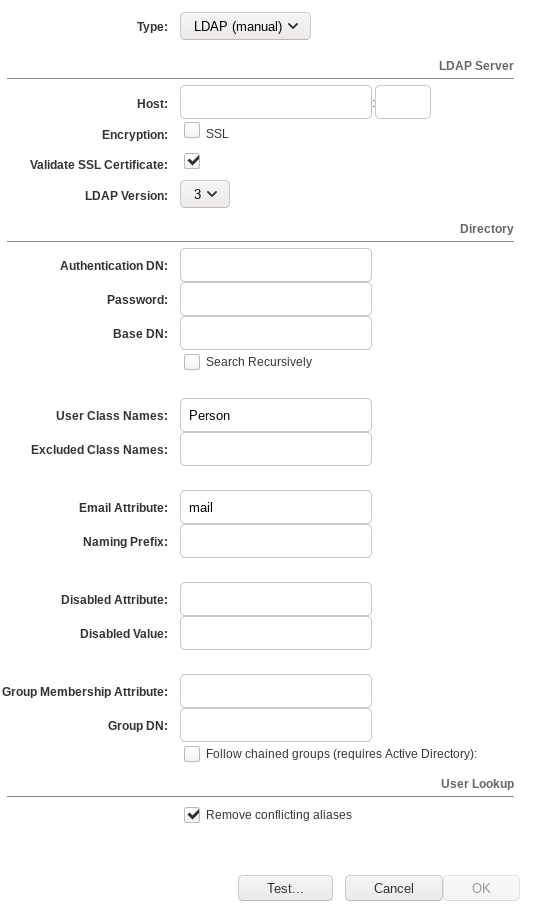
https://<search box hostname>:8443/saml/metadata.xml - Map the attributes in your Identity Provider from LDAP (or elsewhere). Enter the following values:
-
-
NOTE
Attributes may appear slightly different, depending on your Identity Provider. - Map the attributes for group membership for administrators. Enter the following values:
-
NOTE
Attributes may appear slightly different, depending on your Identity Provider.

You should now be able to log in to ARCHIVE and IPRO Search using SSO.
You can configure Single Sign-On (SSO) for the IPRO Admin UI or IPRO Search using SAML with the Azure AD Identity Provider.
You can only use the Identity Provider to configure SSO integration for the IPRO Admin UI or IPRO Search.
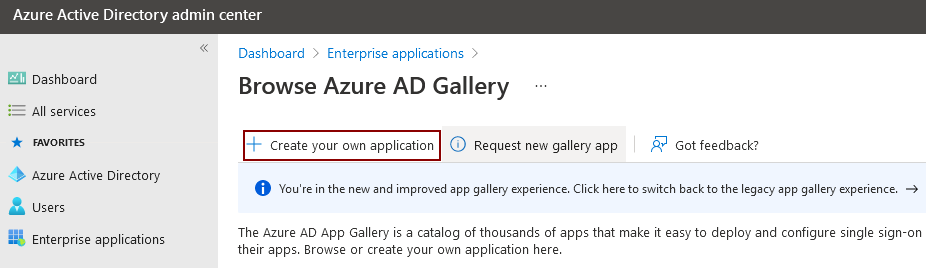
- Log in to the Azure portal as an Administrator with enterprise application creation rights.
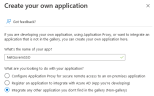
- In the Browse Azure AD Gallery overview, select Create your own application.
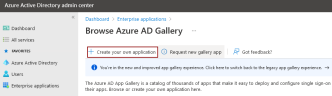
- Enter the name of your application in the relevant field. Select the Integrate any other application you don't find in the gallery (Non-gallery) option.
- The application's overview page will open.
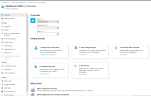
- From the left-hand pane of the overview page, select Single sign-on. Click on SAML to get started.
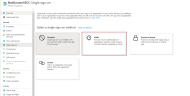
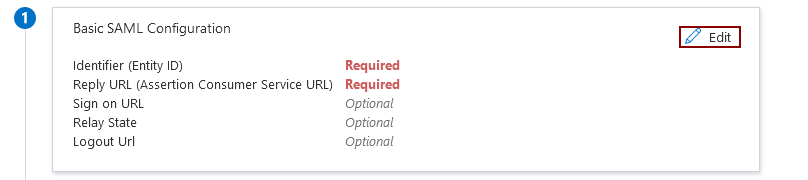
- In the Basic SAML Configuration section, enter the values displayed below. Click Edit to begin.

- Enter the Identifier (Entity ID). This is the URL of the application that you are configuring. Choose one of the following:
- For the IPRO Admin UI:
https://admin.netmail.com/sso/metadata.xml
- For IPRO Search:
https://search.netmail.com/saml/metadata.xml
- Enter the Reply URL (Assertion Customer Service URL). Choose one of the following:
- For the IPRO Admin UI:
https://admin.netmail.com
- For IPRO Search:
https://search.netmail.com
- Enter the Sign On URL. This is the same value entered as the Reply URL.
- Do not enter the Relay State URL.
- Enter the Logout URL only if you are configuring IPRO Search. For IPRO Search, enter the following Logout URL:
https://search.netmail.com/logged_out.html
-
In the next section, Attributes & Claims, leave the default parameters.
NOTE
Your IPRO Support Representative may advise you to adjust the default parameters. To begin, click Edit.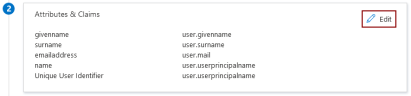
For the IPRO Admin UI, enter the following: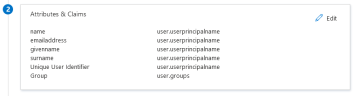
For IPRO Search, enter the following:
-
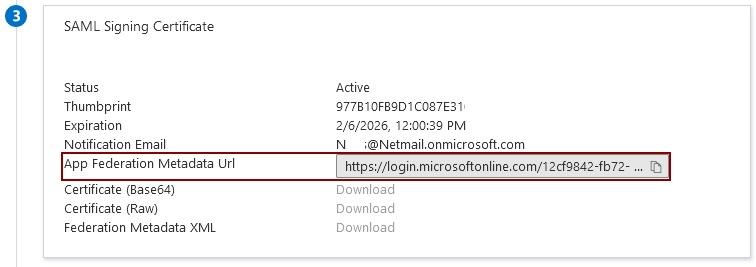
In the next section, SAML Signing Certificate, copy the value entered in the App Federation MetaData URL field. You will be entering this in the IPRO Admin UI.
-

-
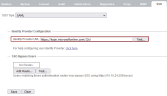
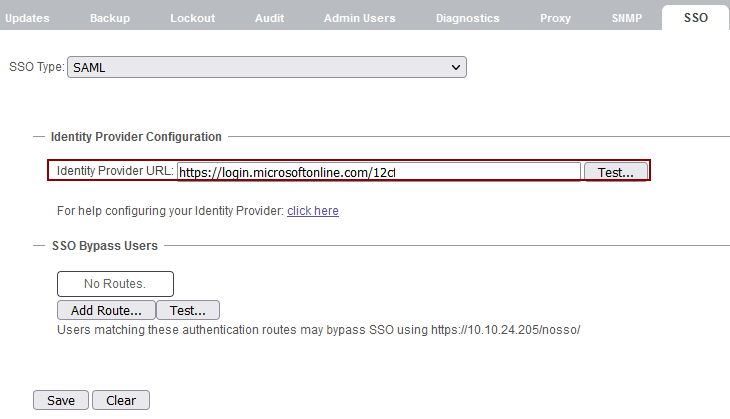
Log into the IPRO Admin UI and navigate to Services > SSO.
-

-
In the Identity Provider Configuration section, paste the App Federation MetaData URL. Click Save.
-
-
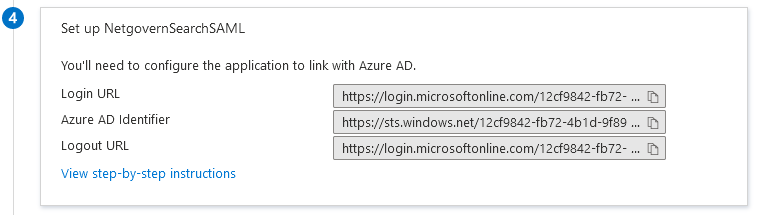
Return to the Azure portal. Review the application configuration details.
-

-
(Optional) Click Test to verify Single Sign-On.
-
NOTE
This option is only available when you have at least one available user with archived and/or indexed data. -

-
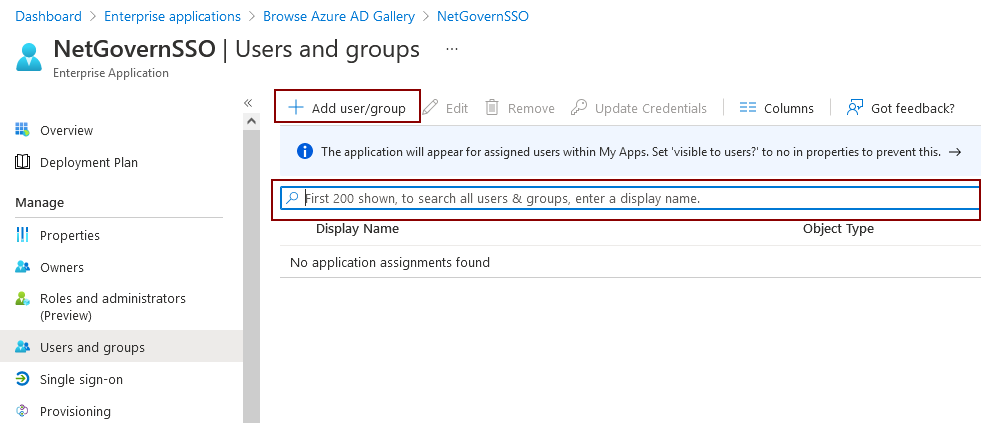
Enable Users and Groups to use Single Sign-On by granting access to the configured application. From the left-hand pane of the application's overview page, select Users and Groups.
You can manually search for Users and/or Groups by using the Search Bar or you can click on Add user/group. The Users and Groups selected will be able to access the IPRO Admin UI or IPRO Search using Single Sign-On (SSO).
-


Using SSO requires a valid certificate. A self-signed certificate will not be sufficient for NetIQ Access Manager 4.5. Please ensure that your system is using a valid, properly-signed certificate before continuing.
- Log into the IPRO Admin UI. In Services, open the SAML tab.
- For Identity Provider, enter the hostname of the NetIQ Access Manager system, and the rest of the URL will populate automatically.
- Example:
https://netiq_fqdn/nidp/saml2/metadata - Click Test, then click Save.
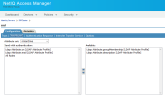
- Configure your Identity Provider to use your IPRO services as the Service Provider. Enter the following metadata URLs:
- IPRO Administration:
https://<hostname>/sso/metadata.xml - IPRO Search:
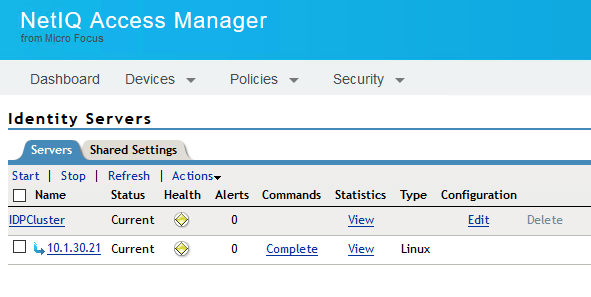
https://<search hostname>:8443/saml/metadata.xml - Log into NetIQ Access Manager.
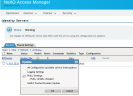
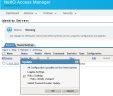
- In the Identity Servers tab, click Edit Configuration.

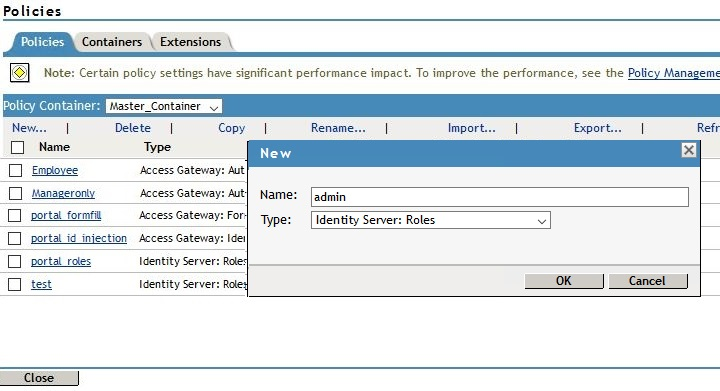
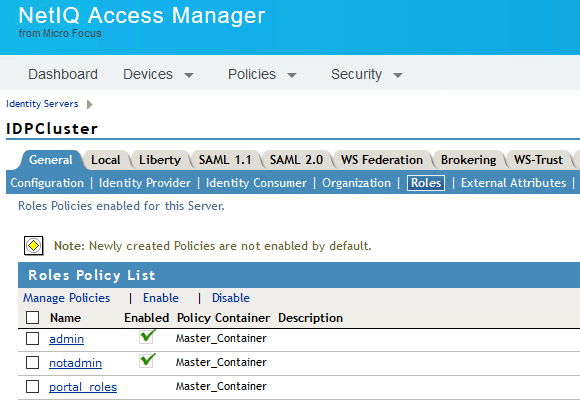
- Go to IDPCluster > Roles > Manage Policies.

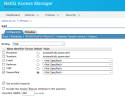
- In Policies, select New and provide a name (i.e., “Admin”). This rule ensures that if the authenticated user is a member of the Admin group in eDirectory, access to the IPRO Admin UI will be granted. Click OK.

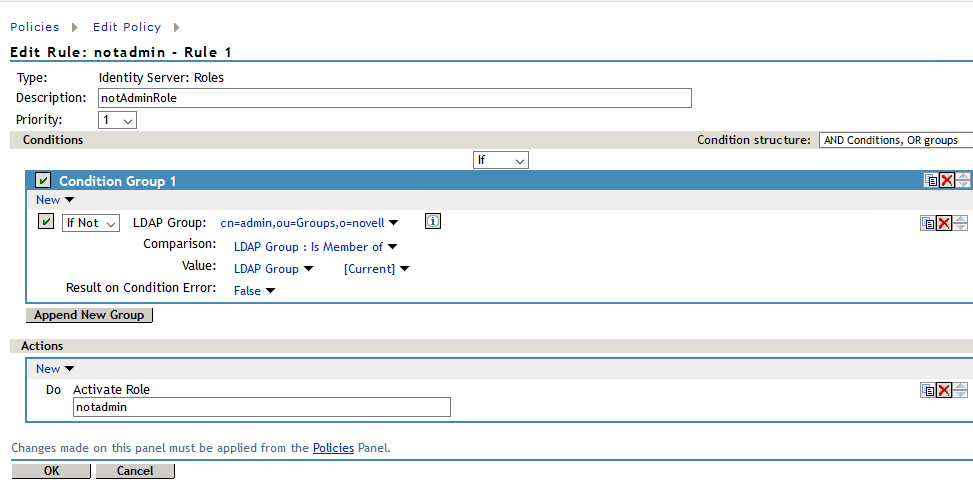
- Create conditions for Admins and actions as shown. Click OK on this page, and on the following page.
- Now do the same for Non-Admins. In Policies, select New and provide a name (i.e., “Non-Admin”). This rule ensures that if the authenticated user is a member of the Non-Admin group in eDirectory, access to the IPRO Admin UI will be granted. Click OK.
- Create conditions for Non-Admins and actions as shown. Click OK on this page, and on the following page.

- Apply the changes and click Close.
- Make sure the new rules you just created are enabled. Select them and click Enable. Click Apply and OK.

- You must update the configuration every time you make changes. On the Identity Servers page, click Update All, then click OK. Click Refresh. On this page, selection options may vary.
- You must update the devices in Access Gateway. Go to Devices > Access Gateways > AG-Cluster, and click Servers to update.

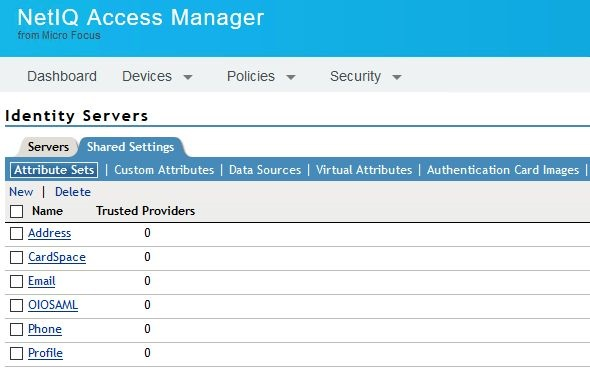
- In Identity Servers, go to the Shared Settings tab.

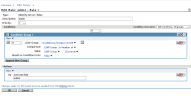
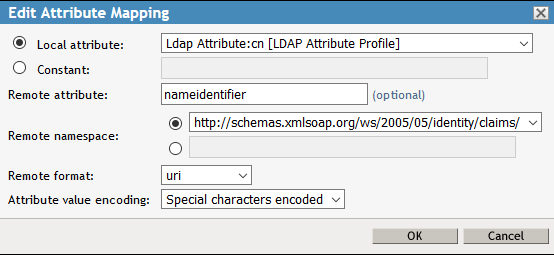
- Click New to create Attribute Mapping for “nameidentifier”. The syntax must be exact. Click OK.

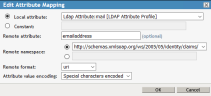
- Click New to create Attribute Mapping for “emailaddress”. The syntax must be exact. Click OK.
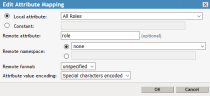
- Click New to create Attribute Mapping for “role”. The syntax must be exact. Click OK.
- You must update the configuration. On the Identity Servers page, click Update All, then click OK. Click Refresh. On this page, selection options may vary.

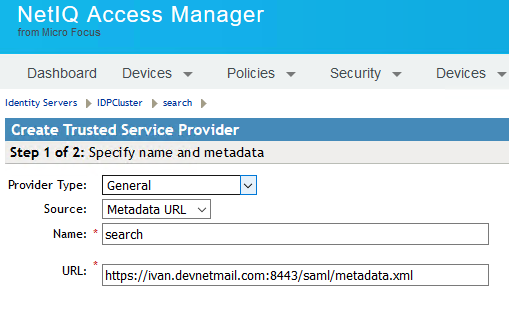
- On the Identity Servers page, click Edit. On the IDPCluster page, go to the SAML2.0 tab to add a Trusted Provider. Click New and select Identity Provider.

- Name the Trusted Provider “Admin” and enter the following URL:
https://<hostname>/sso/metadata.xml- Return to the SAML2.0 tab to add another Trusted Provider. Click New and select Identity Provider.
- Name the Trusted Provider “Search” and enter the following URL:
https://<search hostname>:8443/saml/metadata.xml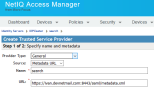
- Click Next to gather the metadata.
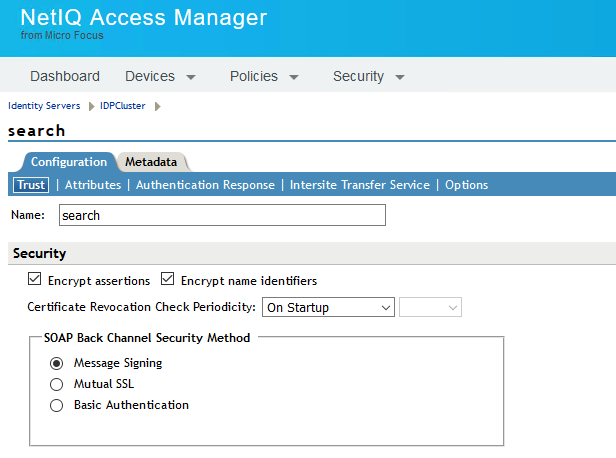
- Go to Identity Servers > IDPCluster > Search > Configuration > Trust. Check Encrypt assertions and Encrypt name identifiers for the Search service.

- Next, do the same for the Admin service. Go to Identity Servers > IDPCluster > UUI > Configuration > Trust. Check Encrypt assertions and Encrypt name identifiers.
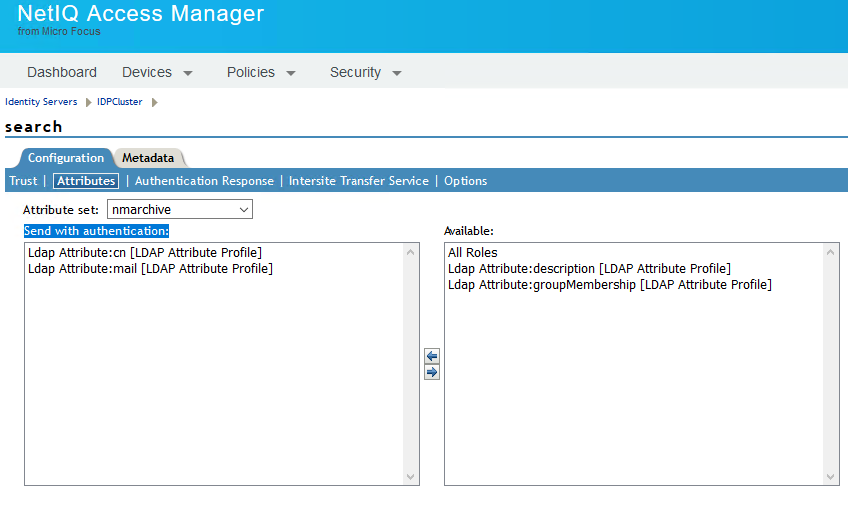
- Go to Identity Servers > IDPCluster > Search > Configuration > Attributes. Ensure that under Send with authentication, both “cn” and “mail” attributes and All Roles are selected for the Search service. Click Apply, then click OK.

- Next, do the same for the Admin service. Go to Identity Servers > IDPCluster > UUI > Configuration > Attributes. Ensure that under Send with authentication, both “cn” and “mail” attributes and All Roles are selected. Click Apply, then click OK.
- Go to Identity Servers > IDPCluster > Search > Configuration > Authentication Response. Set Binding to Post. Set Unspecified to <Not Specified>.
- Next, do the same for the Admin service. Go to Identity Servers > IDPCluster > UUI > Configuration > Authentication Response. Set Binding to Post. Set Unspecified to <Not Specified>.
- You must update the configuration. On the Identity Servers page, click Update All, then click OK. Click Refresh. On this page, selection options may vary.
- Go to Dashboard > Applications > Access and Roles, and select the Admin and Non-Admin roles you previously created. click the Configuration Panel link to update the configuration. SSO configuration in NetIQ Access Manager 4.5 is now complete.


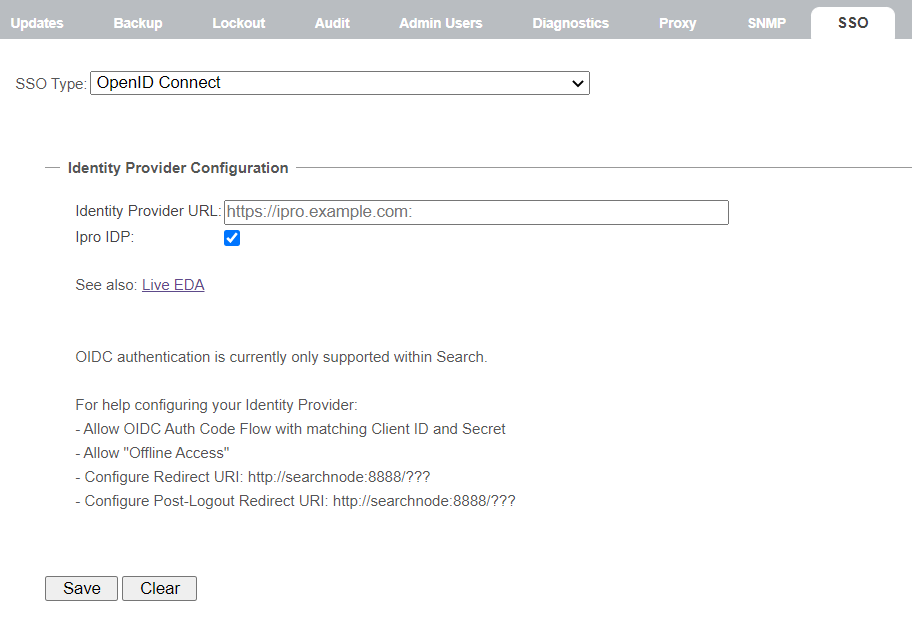
To integrate LIVE EDA in IPRO Search with Live EDA in OPEN DISCOVERY, Single Sign-On must be configured.
- Go to Services > SSO.
- Under SSO Type, select OpenID Connect.

- Select Ipro IDP.
- Enter the Identity Provider URL.
- Click Save.
- Log into the IPRO Admin UI. In Services, go to the SSO tab.
- Clear the Identity Provider URL box.
- Click Save.
SSO should now be disabled.
In most cases, if SSO is configured incorrectly, the ADFS event log can specify the error.
In the event that you have set up SAML incorrectly, you have to redo configuration in the admin URL ending in /saml/.
Example: https://10.201.2.230/saml
Enter your credentials and repeat the configuration steps above.
You can also enter the URL ending in /sso/metadata.xml in order to view and validate authentication details.
Example: https://10.201.2.230/sso/metadata.xml