Tag Multiple Documents (Bulk Tagging)
Bulk tagging allows you to efficiently apply tags to (or remove tags from) a large range of documents, pages, or an entire case.
|
|
NOTE: Applying tags in this way does not include tagging of related documents. Also, previously applied exclusive tags will be changed without notice. (For example, if the exclusive tag “Yes” has been previously applied to a document, applying “No” through bulk tagging will change the tag automatically.) |

To use bulk tagging:
-
Getting started:
-
Identify the case, tag(s), and documents needed for this procedure.
-
Select an appropriate time to perform bulk tagging.

Depending on the size of the database, system capabilities, and other factors, global functions may consume significant system resources and time. It is recommended that you carry out bulk operations during “off hours” to minimize the impact to the system and your users.
-
If users might be logged on, alert them that performance may be affected while you perform bulk tagging.
-
-
In the navigation panel, expand the Client/Case Management menu and click Case Utilities.
-
In the Case Utilities workspace, select one case for which bulk tagging is needed.
-
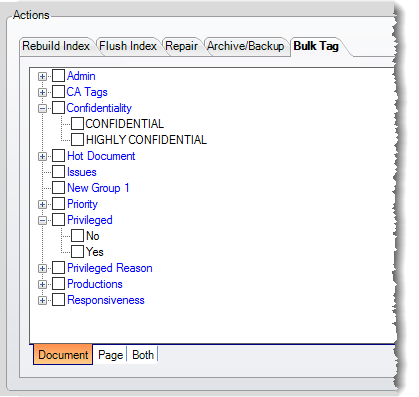
Click the Bulk Tag tab.
-
Click the tab corresponding to the types of tags to be applied: Document, Page, or Both as shown in the following figure.
-
In the list of tags, select the tag(s) to be added or removed.
-
Choose the documents to be tagged:
-
Entire Database (case)
-
Document Range
-
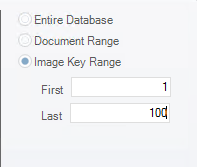
Image Key Range
-
-
For document or image key range, in the First and Last fields, enter the range of documents or image keys to be tagged (or untagged). The following figure shows that the first 100 documents will be tagged.
-
Click Tag (apply tags to) or Untag (remove tags from) the selected documents and/or pages.
-
Click OK in response to the confirmation message and observe the status in the bottom pane.
Related Topics
Last Revision: 6/2/2023
Version: 2019.0.0